Kara's Crafts
I like doing many kinds of crafts -- some of the many that I enjoy are knitting, crocheting, sewing,
quilting, embroidery, tatting, origami, beadwork, needlepoint, cross-stitch, blackwork... and
probably other things that I can't think of right now! I carry my portable crafts around with me
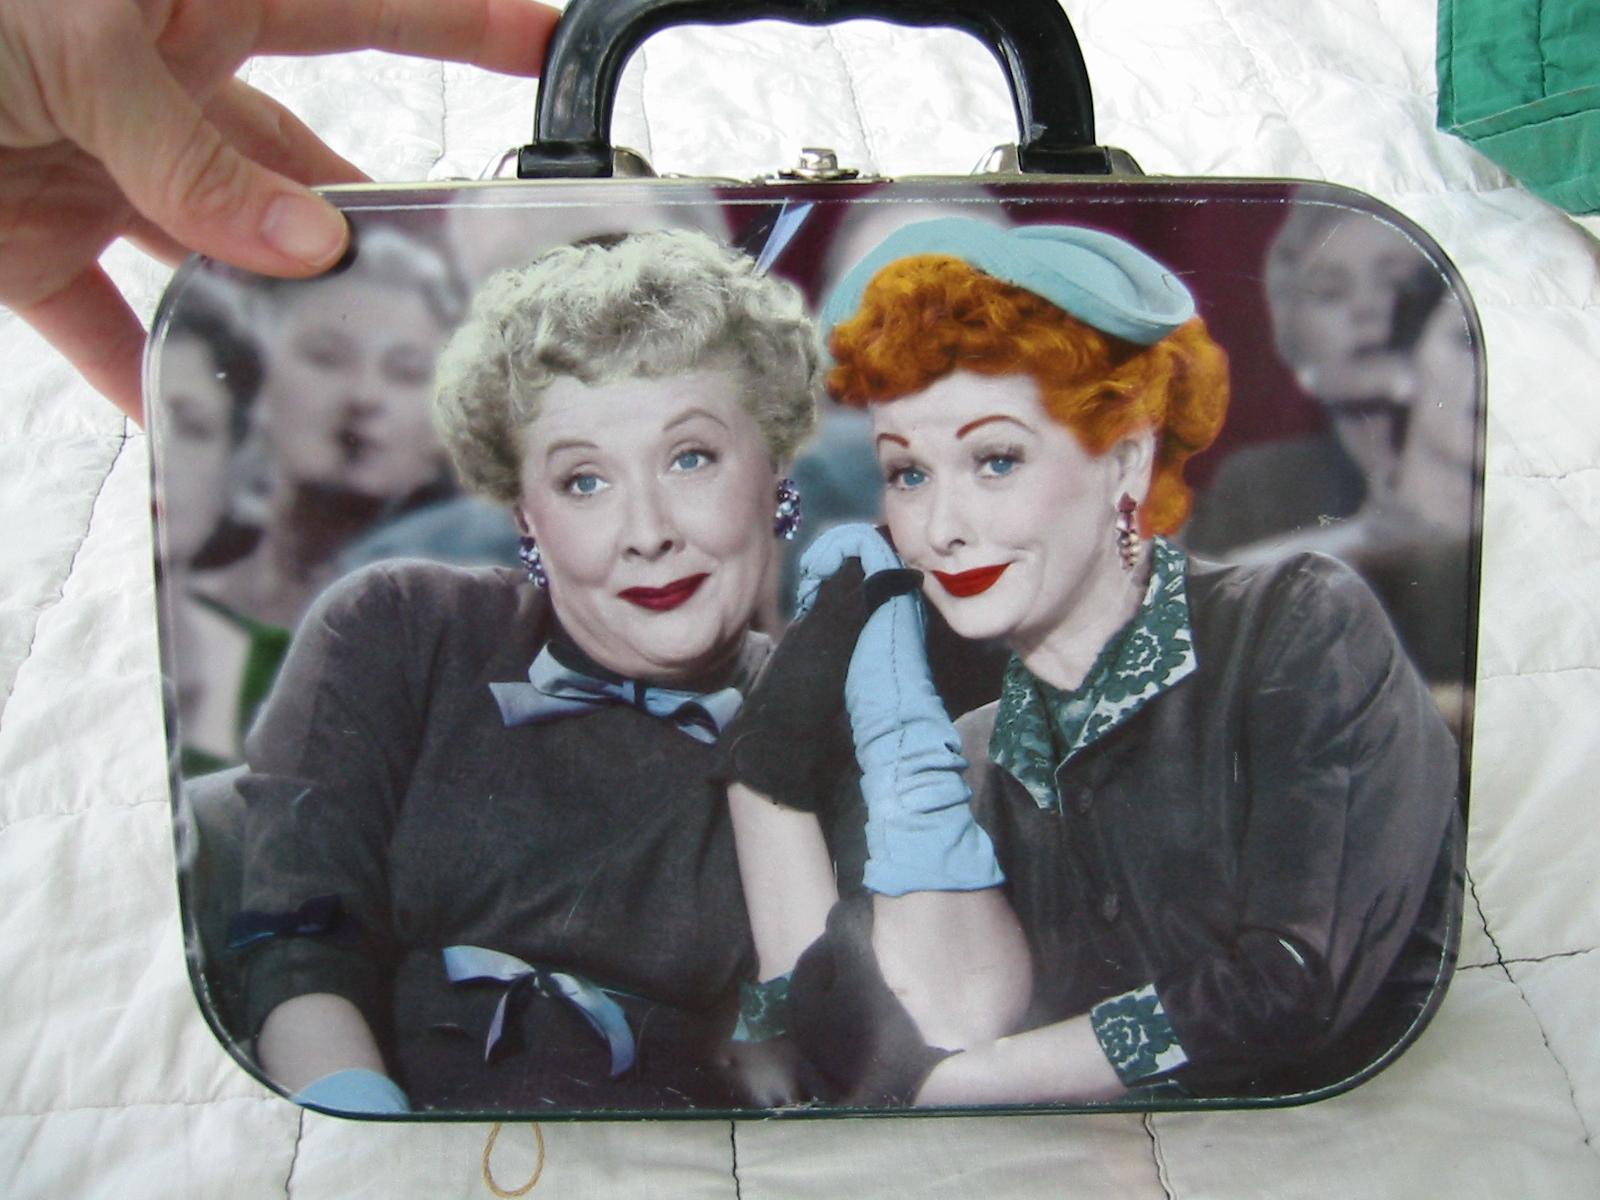
ie my lucy lunchbox. Here, you can see
inside.
On this page I'll show you some of my recent
projects, as well as some older ones of which I am particularly proud. Click on the crummy little blurry thumbnails for
large, crisp, detailed images. Email me (kara@kayray.org) or talk to me
on the AIM (kayrayovac) if you want to talk about any of this stuff :)
|
crafty links
knitty.com
getcrafty.com
schoolhousepress.com
sharon's stitches
sewwrong.com
craftster.org
|
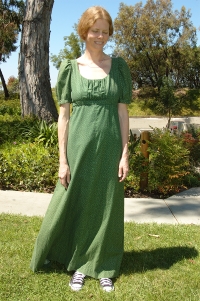
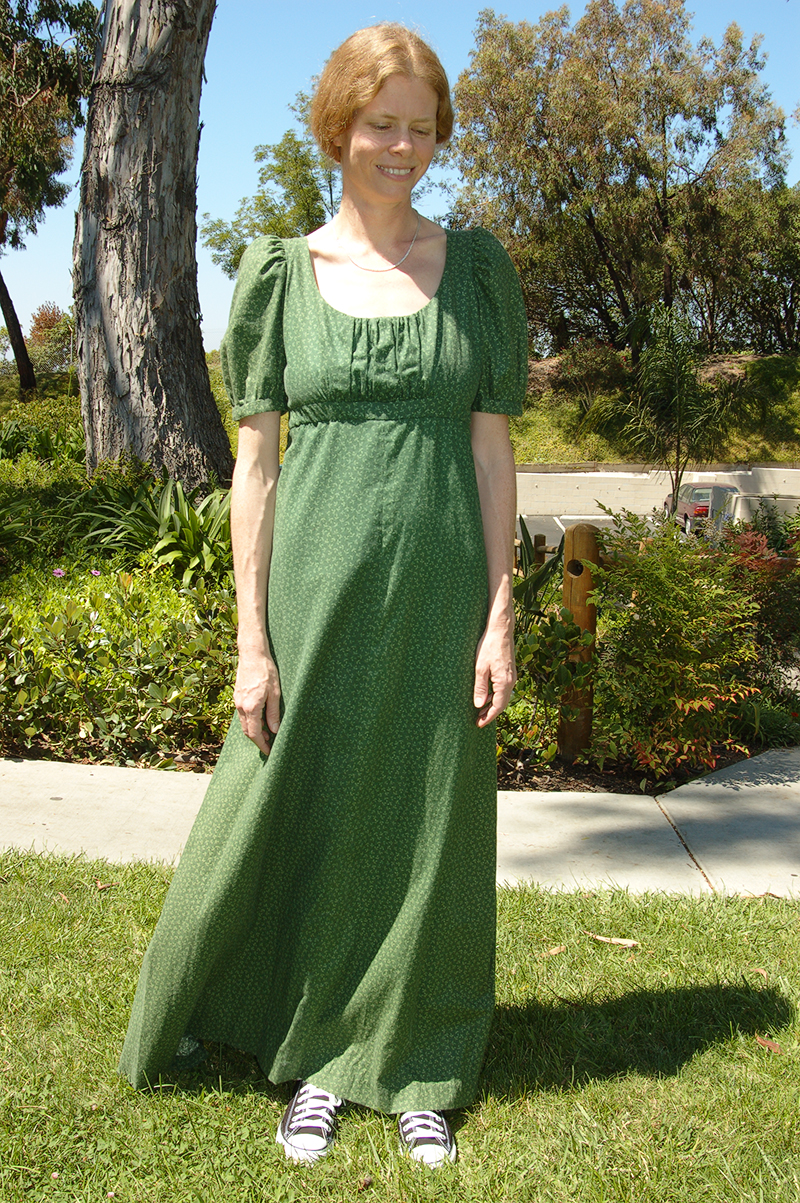
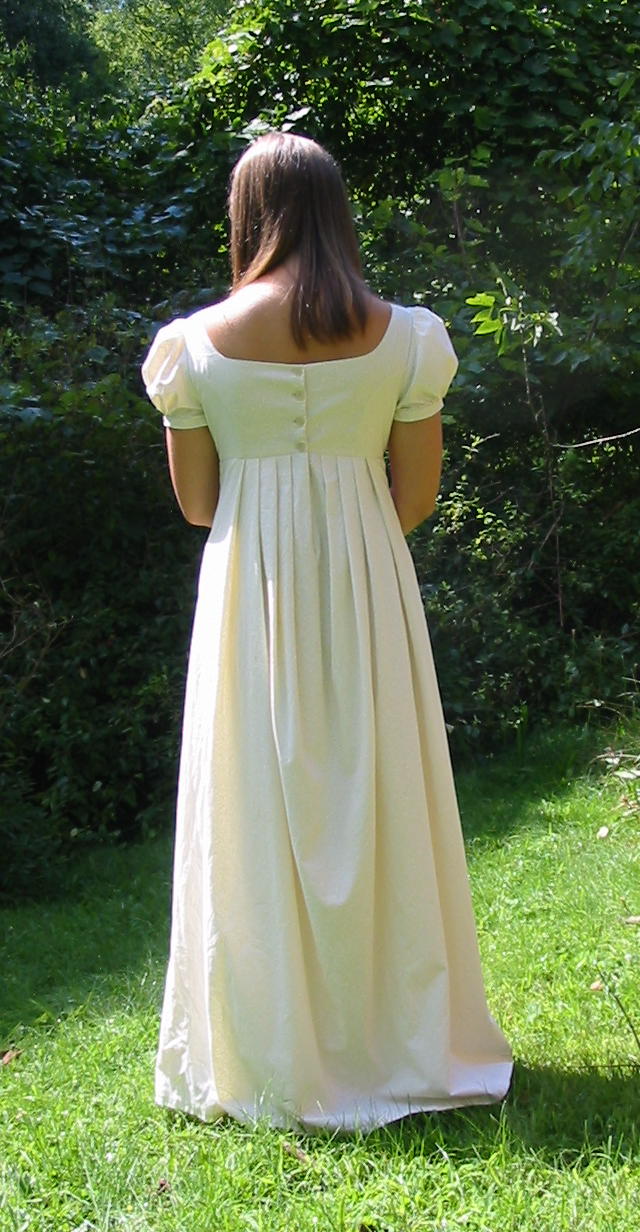
 Chloe's regency dress (sewn July-August 2004). The fabric is a lovely delicate floral print, white on cream. I used the regency dress pattern from
sensibility.com. I had to add half an inch to the bottom of the bodice, and move the
bodice gathers further to the side than the pattern indicated. Also, although we went by Chloe's bust measurement, the bodice ended up being
significatly too wide -- so I made a mock seam up the front to reduce the width. (Yes I made a toile first but the extra width wasn't appparent
until the bodice was constructed and lined. Other than that, it was a very easy and fun pattern to work with! Here's a
back view, so you can see the lovely pleated skirt. :)
Chloe's regency dress (sewn July-August 2004). The fabric is a lovely delicate floral print, white on cream. I used the regency dress pattern from
sensibility.com. I had to add half an inch to the bottom of the bodice, and move the
bodice gathers further to the side than the pattern indicated. Also, although we went by Chloe's bust measurement, the bodice ended up being
significatly too wide -- so I made a mock seam up the front to reduce the width. (Yes I made a toile first but the extra width wasn't appparent
until the bodice was constructed and lined. Other than that, it was a very easy and fun pattern to work with! Here's a
back view, so you can see the lovely pleated skirt. :)
|
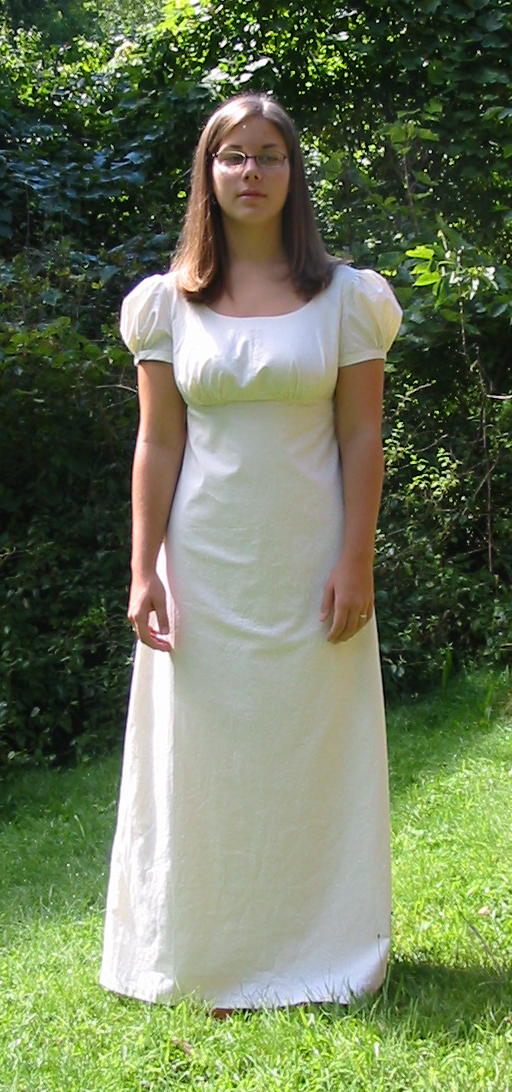
 By contrast, my old regency dress which I made in about... 1998. I used the Period Impressions 1809 Day Dress pattern. It's
a nice dress, but I think the sensibility.com dress has a more flattering neckline and prettier sleeves. Here's a
back view. The pattern called for the skirt to be gathered all the way
around, but I found that it looked too much like maternity wear that way, so I made the front flat and pleated the back.
By contrast, my old regency dress which I made in about... 1998. I used the Period Impressions 1809 Day Dress pattern. It's
a nice dress, but I think the sensibility.com dress has a more flattering neckline and prettier sleeves. Here's a
back view. The pattern called for the skirt to be gathered all the way
around, but I found that it looked too much like maternity wear that way, so I made the front flat and pleated the back.
|

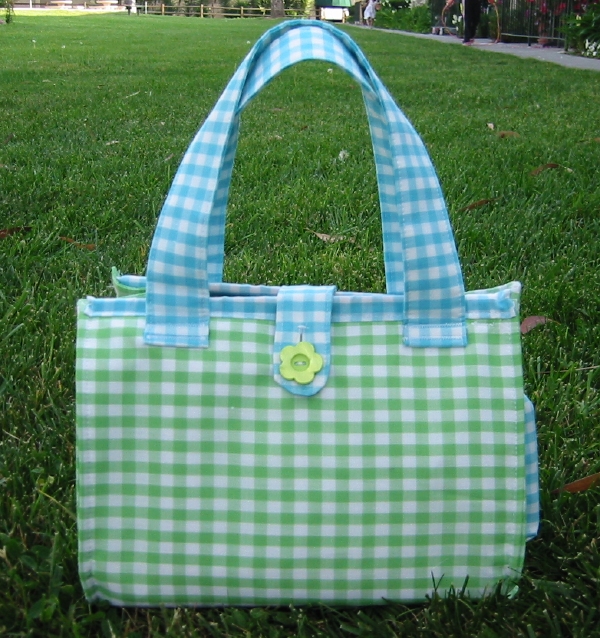
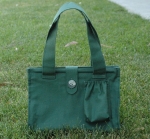 My Grandma gave me a bag of scraps of 1970s gingham, and for some reason I was inspired to invent a purse. It's got dowels in the top
edge to stiffen it, a cellphone pocket on the side, and a couple of interior pockets, too. Also the sides are sort of pleated so
they fold in nicely when you carry it. I made another one out of red and yellow gingham and made a tutorial!
I used a slightly different technique of construction for the tutorial purse, but the result is similar. If you make one, I'd love to see
a photo! The solid green purse on the right, here, is one I made for my sister. She suggested putting the cellphone pocket on the front,
so it didn't interfere with the sides of the purse. Good idea, Kirsten!
My Grandma gave me a bag of scraps of 1970s gingham, and for some reason I was inspired to invent a purse. It's got dowels in the top
edge to stiffen it, a cellphone pocket on the side, and a couple of interior pockets, too. Also the sides are sort of pleated so
they fold in nicely when you carry it. I made another one out of red and yellow gingham and made a tutorial!
I used a slightly different technique of construction for the tutorial purse, but the result is similar. If you make one, I'd love to see
a photo! The solid green purse on the right, here, is one I made for my sister. She suggested putting the cellphone pocket on the front,
so it didn't interfere with the sides of the purse. Good idea, Kirsten!
|
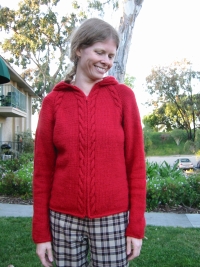
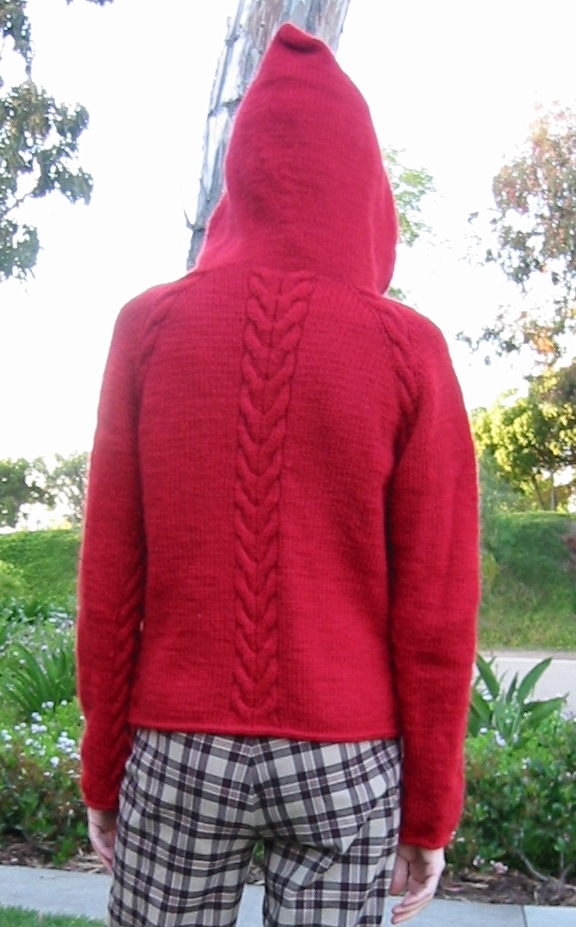
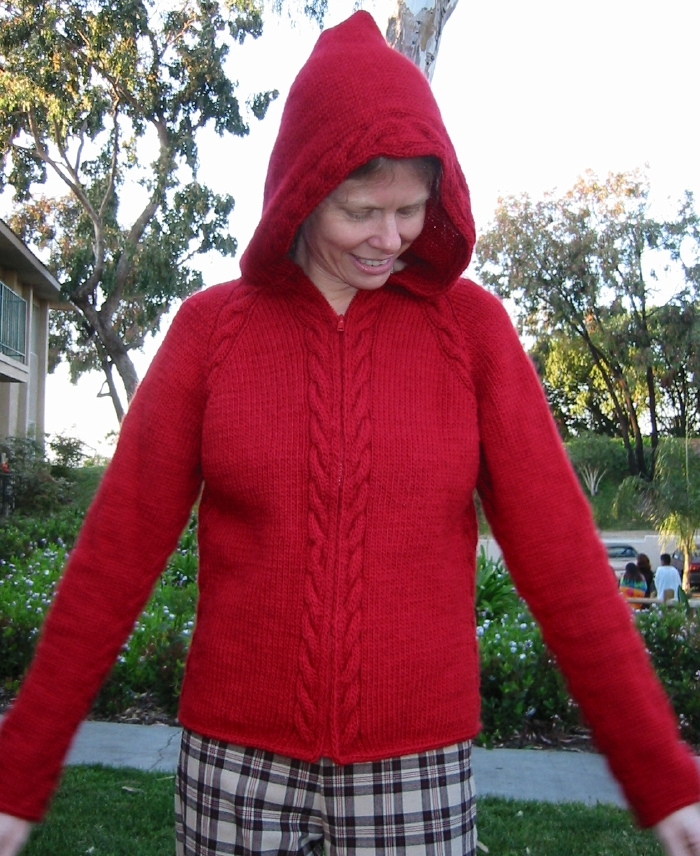
 Here's the long-awaited bpt sweater! It was tremendously fun to knit.
I used Lamb's Pride worsted instead of the extremely expensive yarn the pattern calls for. (Dan bought me the yarn
and helped me pick the color -- ruby red) My gauge was different, 4 stitches and 6
rows to the inch on #6 needles, so I had to re-work the pattern somewhat -- also had to alter it here and there to fit my skinny, long-armed
little self. I found that I had to divide the body and arms a few inches earlier than the pattern said to. Also I grafted the
hood together instead of using three-needle bind off.
Here's the long-awaited bpt sweater! It was tremendously fun to knit.
I used Lamb's Pride worsted instead of the extremely expensive yarn the pattern calls for. (Dan bought me the yarn
and helped me pick the color -- ruby red) My gauge was different, 4 stitches and 6
rows to the inch on #6 needles, so I had to re-work the pattern somewhat -- also had to alter it here and there to fit my skinny, long-armed
little self. I found that I had to divide the body and arms a few inches earlier than the pattern said to. Also I grafted the
hood together instead of using three-needle bind off.
Before I began the sweater, I made graph-paper charts of all the different cables. This really helped
me before I got them memorized. I also kept a tally on
the graph paper of each row as I knit it, so I could plan ahead for the
cable-crossing rows and increases and decreases and such. This also helped me
to make the sleeves match :) I made the sleeves a couple of inches longer, and the hood a couple of inches shorter --
the 15" hood that the pattern suggests seemed enormous, but maybe I have an unusually small head. I need to re-block the tip
of the hood, as you can see. Here are a couple more photos: bpt2_small.jpg, in which you
can see the grafted top-of-hood and the blurry under-arm cables, and
bpt3_small.jpg, a cute side-view.
|
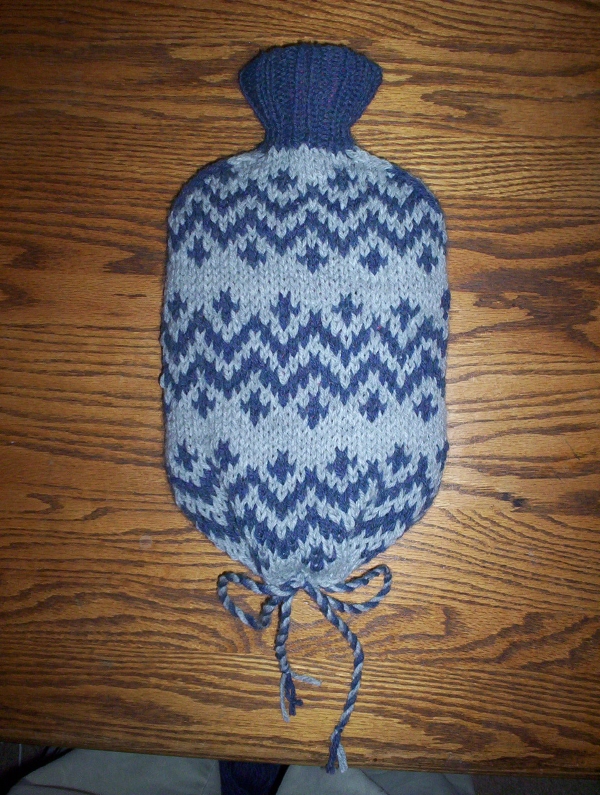
 Knitted cover for our hot-water bottle. It's made of Lion Brand Wool Ease (it's all I had handy) on a largish circular needle
at a gauge of 4 stitches to the inch. I cast on 64 stitches (later increased to 66 to make the pattern repeat properly)
and worked in the round. The shoulders were decreased with K2tog, K2, SSK on each side, every round. I switched to dp needles
when necessary, kept decreasing until I had 30 stitches remaining (32 would have been better), then did the neck in K2, P2
ribbing and bound off a little past
the end of the bottle's neck. Then I made a twisted cord for the drawstring and threaded it through the bottom -- if I ever
make another, I'll leave eyelets at the bottom, heheh.
Knitted cover for our hot-water bottle. It's made of Lion Brand Wool Ease (it's all I had handy) on a largish circular needle
at a gauge of 4 stitches to the inch. I cast on 64 stitches (later increased to 66 to make the pattern repeat properly)
and worked in the round. The shoulders were decreased with K2tog, K2, SSK on each side, every round. I switched to dp needles
when necessary, kept decreasing until I had 30 stitches remaining (32 would have been better), then did the neck in K2, P2
ribbing and bound off a little past
the end of the bottle's neck. Then I made a twisted cord for the drawstring and threaded it through the bottom -- if I ever
make another, I'll leave eyelets at the bottom, heheh.
|
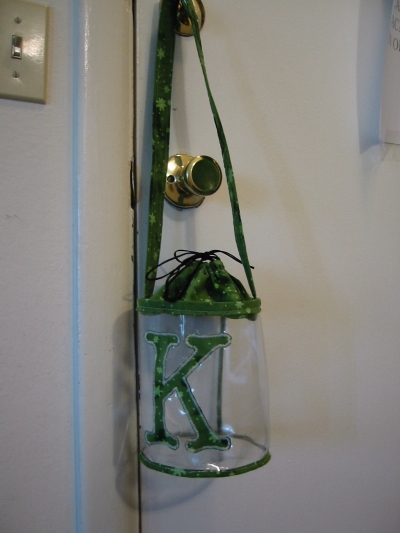
 Here's a little bag I made for a purse-swap. It was really fun to make! I started by making a barrel-shaped bag of
clear vinyl, and I bound the seams with strips of the green batiked cotton. Then I made the top part, which was really just a
rectangle with a casing at the top, made with two drawstrings. I sewed that on under a top binding, and added straps. Then I
decided to personalize it for my swap buddy -- her name starts with a "K" so I picked a nice font and printed a huge "K", which I
then pinned over green cloth on the vinyl. Then I used a straight stitch to outline the "K", and then tore off the paper. Then
satin-stitched around the outline and trimmed off the extra cloth. That took a long time, boy oh boy. If I ever do this again,
I'll do the applique BEFORE I construct the purse!
Here's a little bag I made for a purse-swap. It was really fun to make! I started by making a barrel-shaped bag of
clear vinyl, and I bound the seams with strips of the green batiked cotton. Then I made the top part, which was really just a
rectangle with a casing at the top, made with two drawstrings. I sewed that on under a top binding, and added straps. Then I
decided to personalize it for my swap buddy -- her name starts with a "K" so I picked a nice font and printed a huge "K", which I
then pinned over green cloth on the vinyl. Then I used a straight stitch to outline the "K", and then tore off the paper. Then
satin-stitched around the outline and trimmed off the extra cloth. That took a long time, boy oh boy. If I ever do this again,
I'll do the applique BEFORE I construct the purse!
|
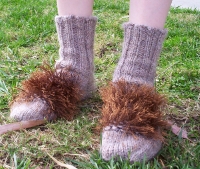
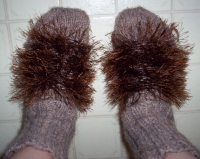 Little boys who love to dress as Frodo need Hobbit Feet, right? One day while I was driving it occured to me that
I could knit him some Hobbit Feet with some of that new-fangled "eyelash" yarn for the furry part. So on my next
trip to Michael's (lowest common denominator yarns, but oh well at least it's close to home) I got a skein of
Lion Brand "Wool-Ease" worsted-weight 80% acrylic/ 20% wool yarn in a sort of pinkish-tannish color and a skein
of Lion Brand "Fun Fur" eyelash yarn in chocolate brown, 100% polyester. I knit the socks in the normal way
until I had turned the heel and decreased away the extra stitches. Then I put the top-foot stitches (half the total) on
a needle and knit back and forth on them, incorporating the eyelash yarn for the furry foot part. It didn't
work to simply hold the eyelash yarn together with the worsted -- all the fur ended up on the inside of the fabric!
I ended up inventing a strange sort of alternating yarn moss stitch, working loosely and carrying the eyelash yarn across the FRONT
of the fabric at all times, and the worsted across the BACK. That made a nice, stretchy, furry fabric. Then I picked up
the bottom-foot stitches and knit them back and forth, joining with the edges of the foot-top. When I reached toe-
length, I knit in the round again and made a regular toe.
Henry loves them and wore them all day. The eyelash yarn crushes down so they can be worn as regular socks, too :) If you, or a
Hobbit fan in your life, would like a pair of these socks, let me know!
Little boys who love to dress as Frodo need Hobbit Feet, right? One day while I was driving it occured to me that
I could knit him some Hobbit Feet with some of that new-fangled "eyelash" yarn for the furry part. So on my next
trip to Michael's (lowest common denominator yarns, but oh well at least it's close to home) I got a skein of
Lion Brand "Wool-Ease" worsted-weight 80% acrylic/ 20% wool yarn in a sort of pinkish-tannish color and a skein
of Lion Brand "Fun Fur" eyelash yarn in chocolate brown, 100% polyester. I knit the socks in the normal way
until I had turned the heel and decreased away the extra stitches. Then I put the top-foot stitches (half the total) on
a needle and knit back and forth on them, incorporating the eyelash yarn for the furry foot part. It didn't
work to simply hold the eyelash yarn together with the worsted -- all the fur ended up on the inside of the fabric!
I ended up inventing a strange sort of alternating yarn moss stitch, working loosely and carrying the eyelash yarn across the FRONT
of the fabric at all times, and the worsted across the BACK. That made a nice, stretchy, furry fabric. Then I picked up
the bottom-foot stitches and knit them back and forth, joining with the edges of the foot-top. When I reached toe-
length, I knit in the round again and made a regular toe.
Henry loves them and wore them all day. The eyelash yarn crushes down so they can be worn as regular socks, too :) If you, or a
Hobbit fan in your life, would like a pair of these socks, let me know!
|
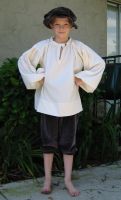 Henry needed a new Renaissance Fair costume! I designed and made it all myself, of course. The breeches and
hat are gray cotton stretch velveteen, from an old tunic of Mom's that she didn't want anymore. The shirt is
unbleached muslin, and I'm rather proud of the handsome neck treatments and pleated sleeves :) He has a green
cape to wear over it if it gets cold. He says it will be a very good Frodo costume too :)
Henry needed a new Renaissance Fair costume! I designed and made it all myself, of course. The breeches and
hat are gray cotton stretch velveteen, from an old tunic of Mom's that she didn't want anymore. The shirt is
unbleached muslin, and I'm rather proud of the handsome neck treatments and pleated sleeves :) He has a green
cape to wear over it if it gets cold. He says it will be a very good Frodo costume too :)
|
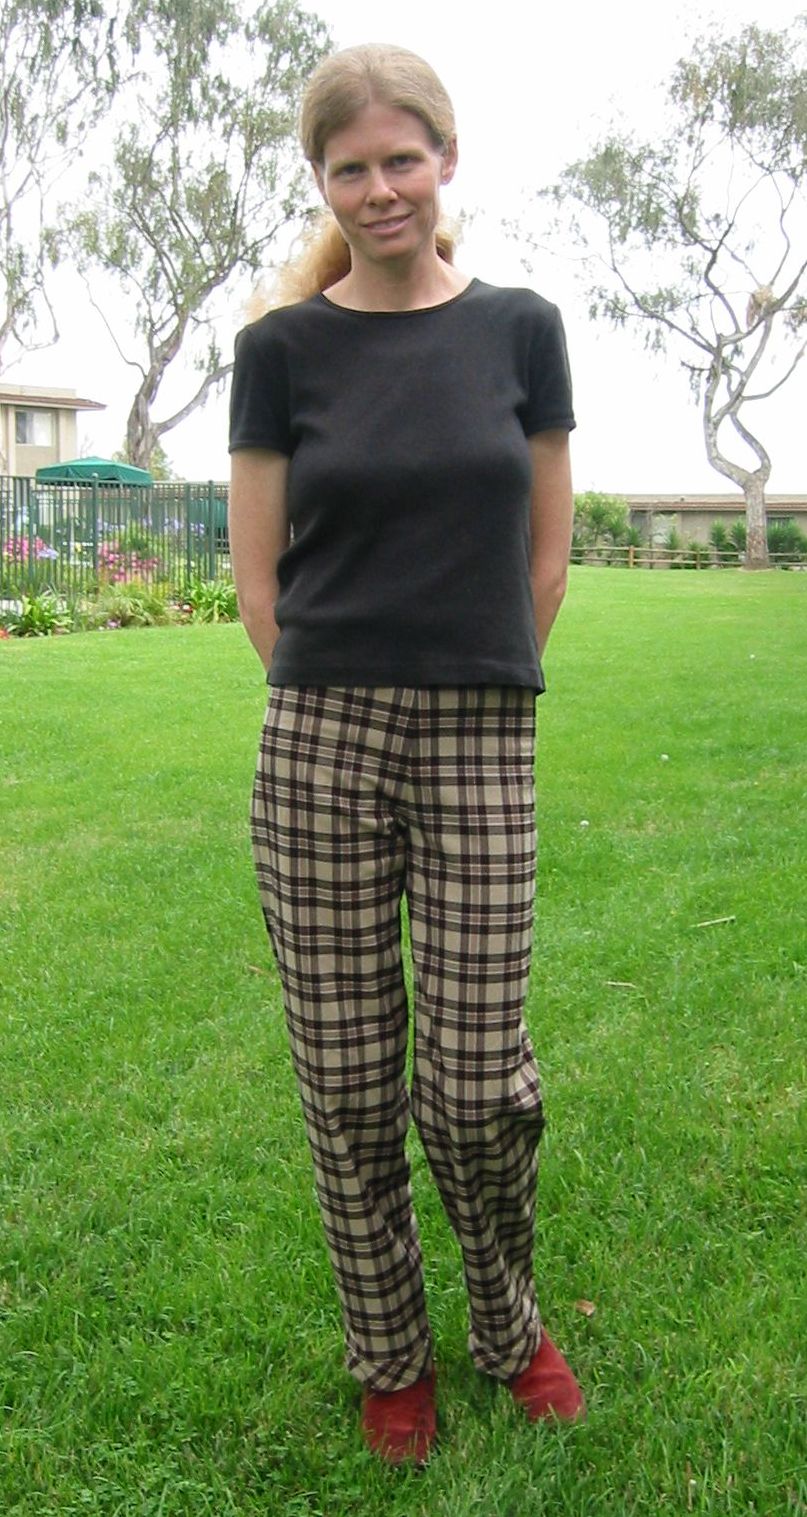
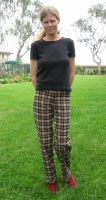 I had a pants-making spree in spring of 2003. I created a good, well-fitting pattern and made this pair of
a polyester/cotton/spandex blend that was on sale for, I think, $3/yard. They have a faced waist and a side zipper, very sleek,
and bias-cut cuffs. I love them.
I had a pants-making spree in spring of 2003. I created a good, well-fitting pattern and made this pair of
a polyester/cotton/spandex blend that was on sale for, I think, $3/yard. They have a faced waist and a side zipper, very sleek,
and bias-cut cuffs. I love them.
|
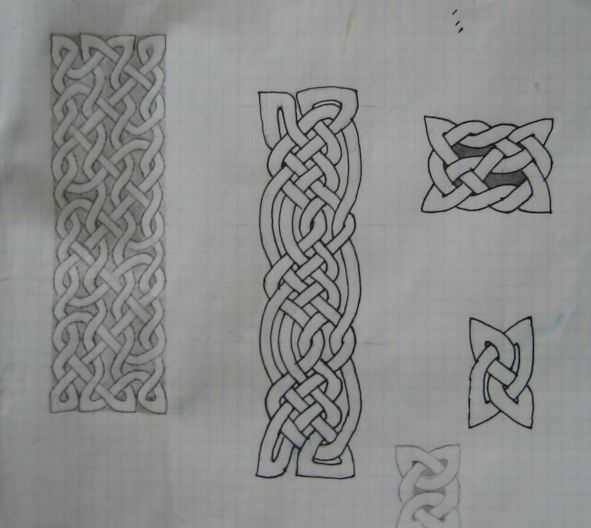
 I learned how to draw Celtic Knotwork a few years ago, from the book by Andy Sloss. Wonderful book!
Drawing knots is so very soothing... it's kind of like a puzzle, too, and sometimes when I draw a
very complicated one I wonder if it will turn out alright... and then when it does it's so satisfying! Here's
a page with just a few that I drew one day recently at the field with Dan.
I learned how to draw Celtic Knotwork a few years ago, from the book by Andy Sloss. Wonderful book!
Drawing knots is so very soothing... it's kind of like a puzzle, too, and sometimes when I draw a
very complicated one I wonder if it will turn out alright... and then when it does it's so satisfying! Here's
a page with just a few that I drew one day recently at the field with Dan.
|
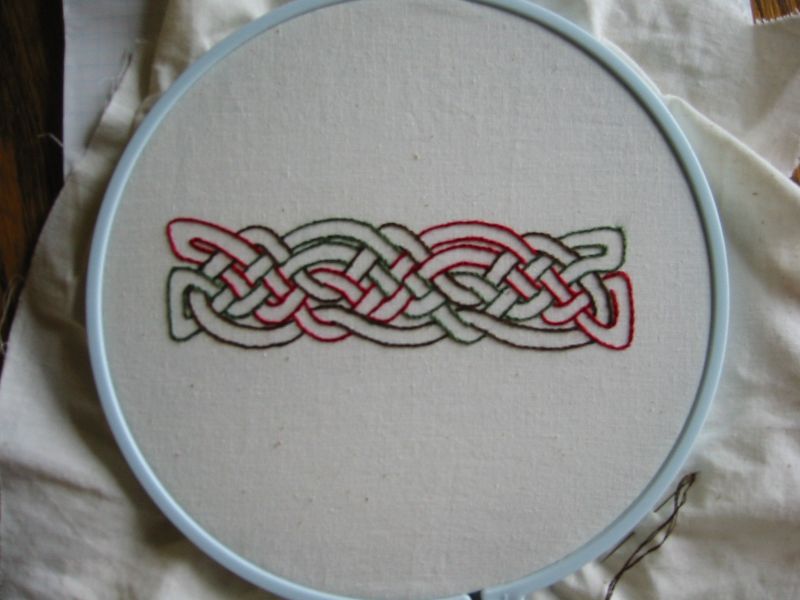
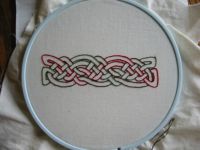 And I traced one of my knots onto some muslin so I could try a little embroidery! I used to do crewel
embroidery kits all the time when I was a kid. This was really fun to do! After I got this much done
(and took the photo) I filled in the bands with various stitches... the result looks a little too busy
to me. I liked it better plain, as in this photo. Ah well I'll do another :)
And I traced one of my knots onto some muslin so I could try a little embroidery! I used to do crewel
embroidery kits all the time when I was a kid. This was really fun to do! After I got this much done
(and took the photo) I filled in the bands with various stitches... the result looks a little too busy
to me. I liked it better plain, as in this photo. Ah well I'll do another :)
|
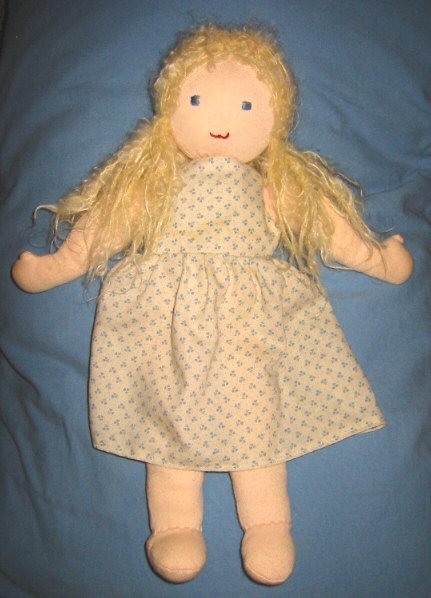
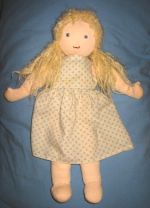 I made this darling 16" Waldorf-style doll a couple of years ago.
She's very very soft and cuddly, and I'm rather proud of the way her hair turned out. If you want a similar
doll for you or your child, please contact me -- I'll custom-make one for you, with your choice of skin and hair
color!
I made this darling 16" Waldorf-style doll a couple of years ago.
She's very very soft and cuddly, and I'm rather proud of the way her hair turned out. If you want a similar
doll for you or your child, please contact me -- I'll custom-make one for you, with your choice of skin and hair
color!
|
 Ok here's my finished afghan! It's gorgeous. The colors in
this photo turned out well -- that's *really* what it looks like (although perspective makes it look
slanted-- it's actually perfectly rectangular). I'm very proud! (Update -- my afghan won second place in its
division in the 2003 San Diego County Fair!) Ok here's my finished afghan! It's gorgeous. The colors in
this photo turned out well -- that's *really* what it looks like (although perspective makes it look
slanted-- it's actually perfectly rectangular). I'm very proud! (Update -- my afghan won second place in its
division in the 2003 San Diego County Fair!)
|
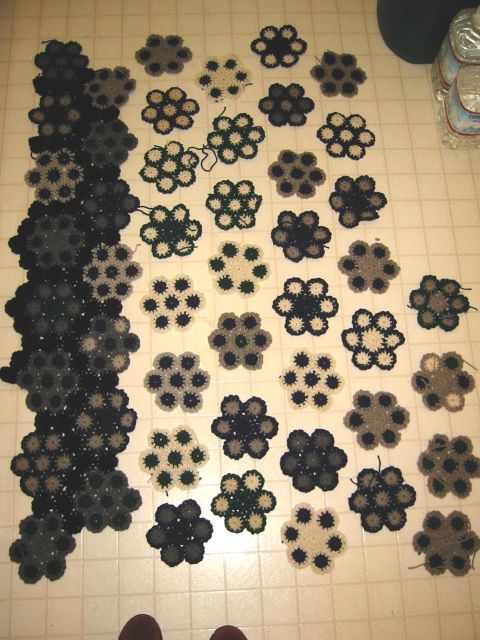
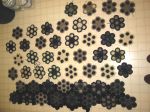 Here's the afghan that I've been working on since December. It's still unfinished but I've just
completed the last of the 53 flowers that I needed. This photo was taken at night on my kitchen floor and the
colors are kind of dark, but really it's so beautiful! The colors, in case you can't tell, are dark blue,
forest green, oatmeal, and gray, with black joining them all together. I'll post a good photo of the completed
project when it's done! (instructions for this style of afghan are here)
Here's the afghan that I've been working on since December. It's still unfinished but I've just
completed the last of the 53 flowers that I needed. This photo was taken at night on my kitchen floor and the
colors are kind of dark, but really it's so beautiful! The colors, in case you can't tell, are dark blue,
forest green, oatmeal, and gray, with black joining them all together. I'll post a good photo of the completed
project when it's done! (instructions for this style of afghan are here)
|
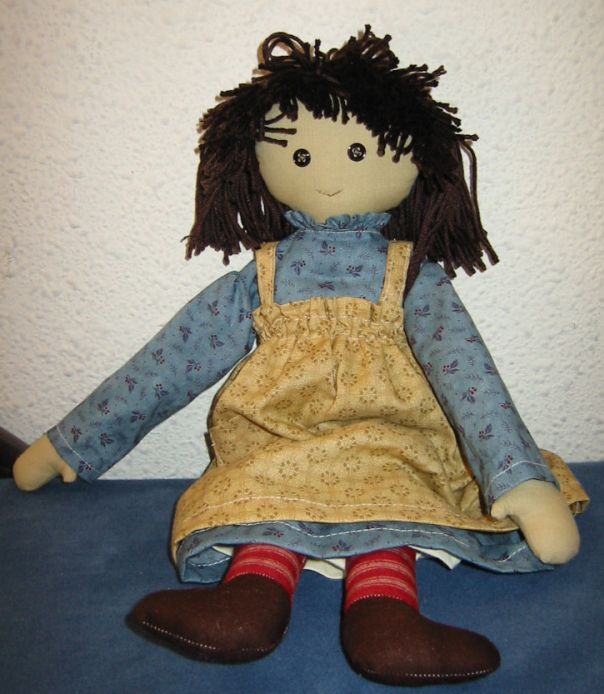
 This is a lovely little rag doll that Henry and I made from a kit that Sally bought for us. She has a brother
who isn't done yet... we'll finish him soon :) The kit was rather fancy -- intended for people who want to
create an "antique-looking" doll. We simplified things a great deal (omitted the tan dye bath and the sandpaper-
wear, since she'll look "played-with" soon enough ;-) and changed her face to suit ourselves. Also as you can
see I stitched everything by machine, with white
thread -- hey it was handy and Henry was in a hurry for his doll to be finished :)
This is a lovely little rag doll that Henry and I made from a kit that Sally bought for us. She has a brother
who isn't done yet... we'll finish him soon :) The kit was rather fancy -- intended for people who want to
create an "antique-looking" doll. We simplified things a great deal (omitted the tan dye bath and the sandpaper-
wear, since she'll look "played-with" soon enough ;-) and changed her face to suit ourselves. Also as you can
see I stitched everything by machine, with white
thread -- hey it was handy and Henry was in a hurry for his doll to be finished :)
|
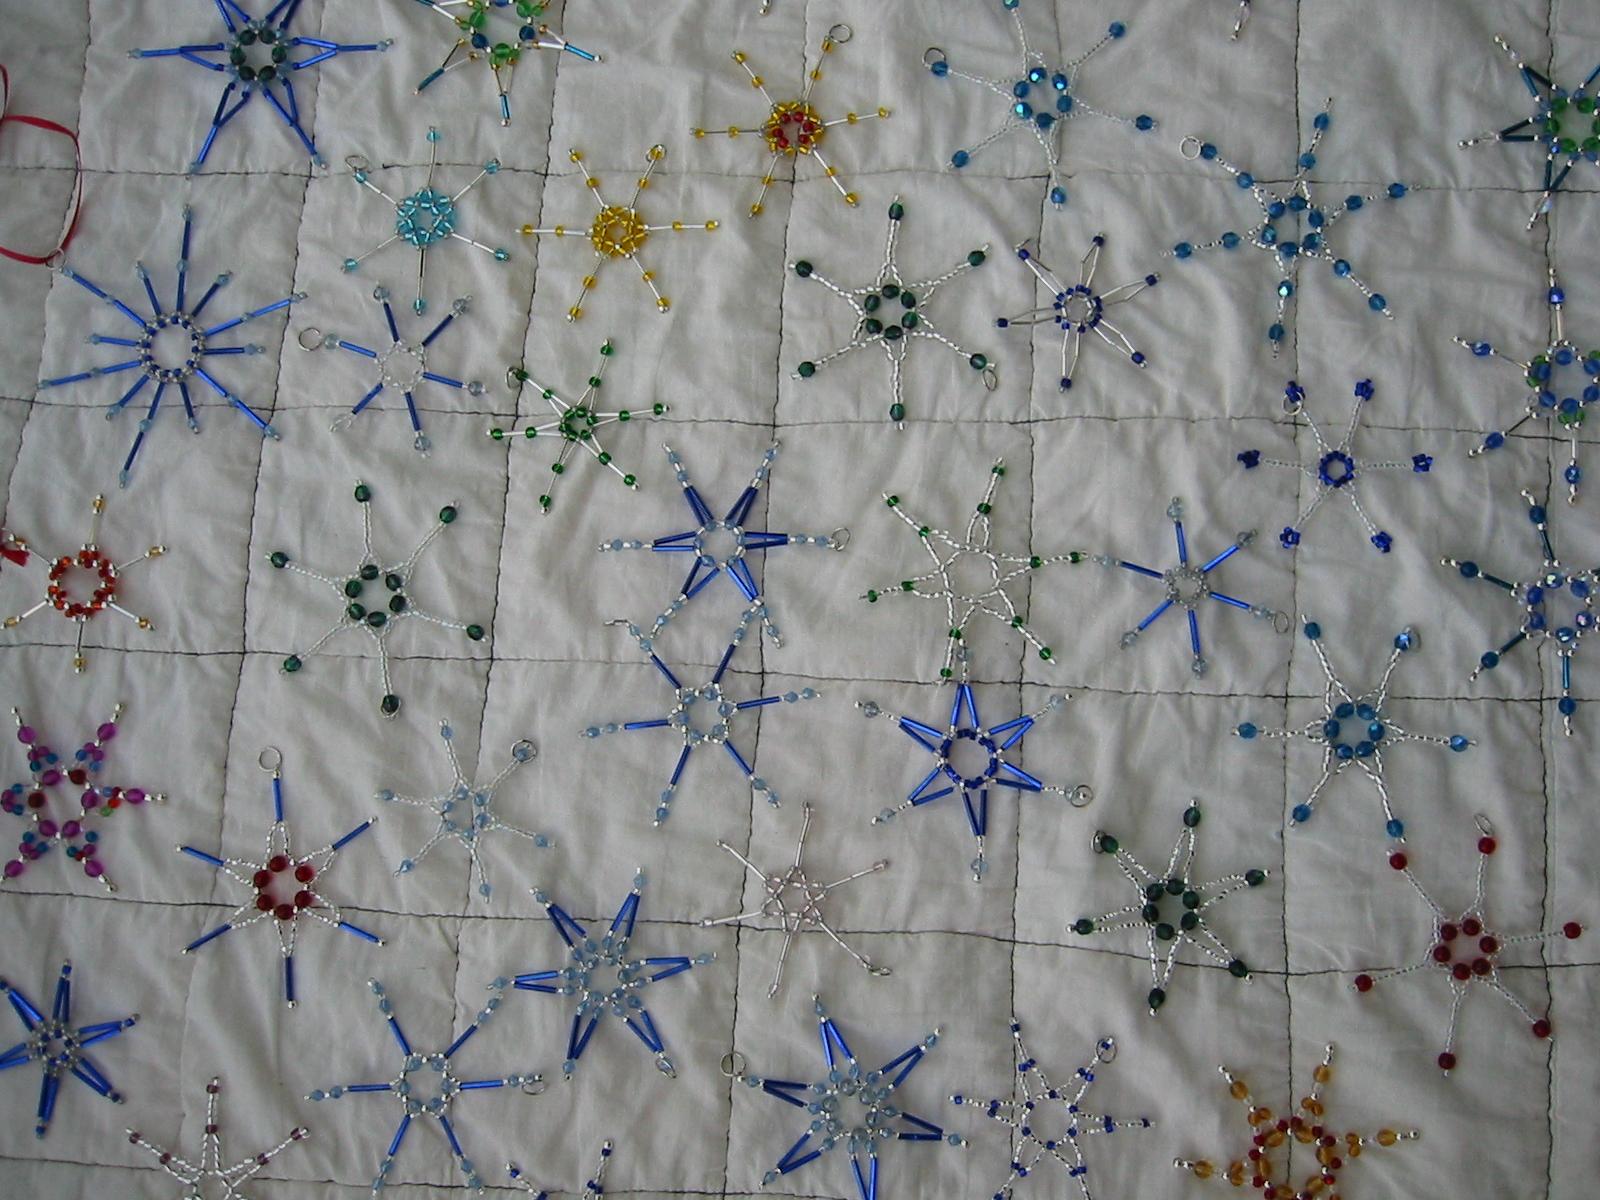
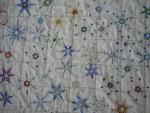 I learned how to make beaded snowflakes with a kit from hearthsong
and enjoyed it so much that I bought a whole bunch more glass beads and went to town! They are going
to look so lovely on our Christmas tree. I really enjoy working with glass beads. I'm not sure what
it is... they just feel and look so good, all hard and sparkling and delicate. This photo really
does not do them justice at all, but you can at least get an idea. Want to make some? My
How to Make Beaded Snowflakes page is up!
I learned how to make beaded snowflakes with a kit from hearthsong
and enjoyed it so much that I bought a whole bunch more glass beads and went to town! They are going
to look so lovely on our Christmas tree. I really enjoy working with glass beads. I'm not sure what
it is... they just feel and look so good, all hard and sparkling and delicate. This photo really
does not do them justice at all, but you can at least get an idea. Want to make some? My
How to Make Beaded Snowflakes page is up!
|
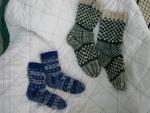
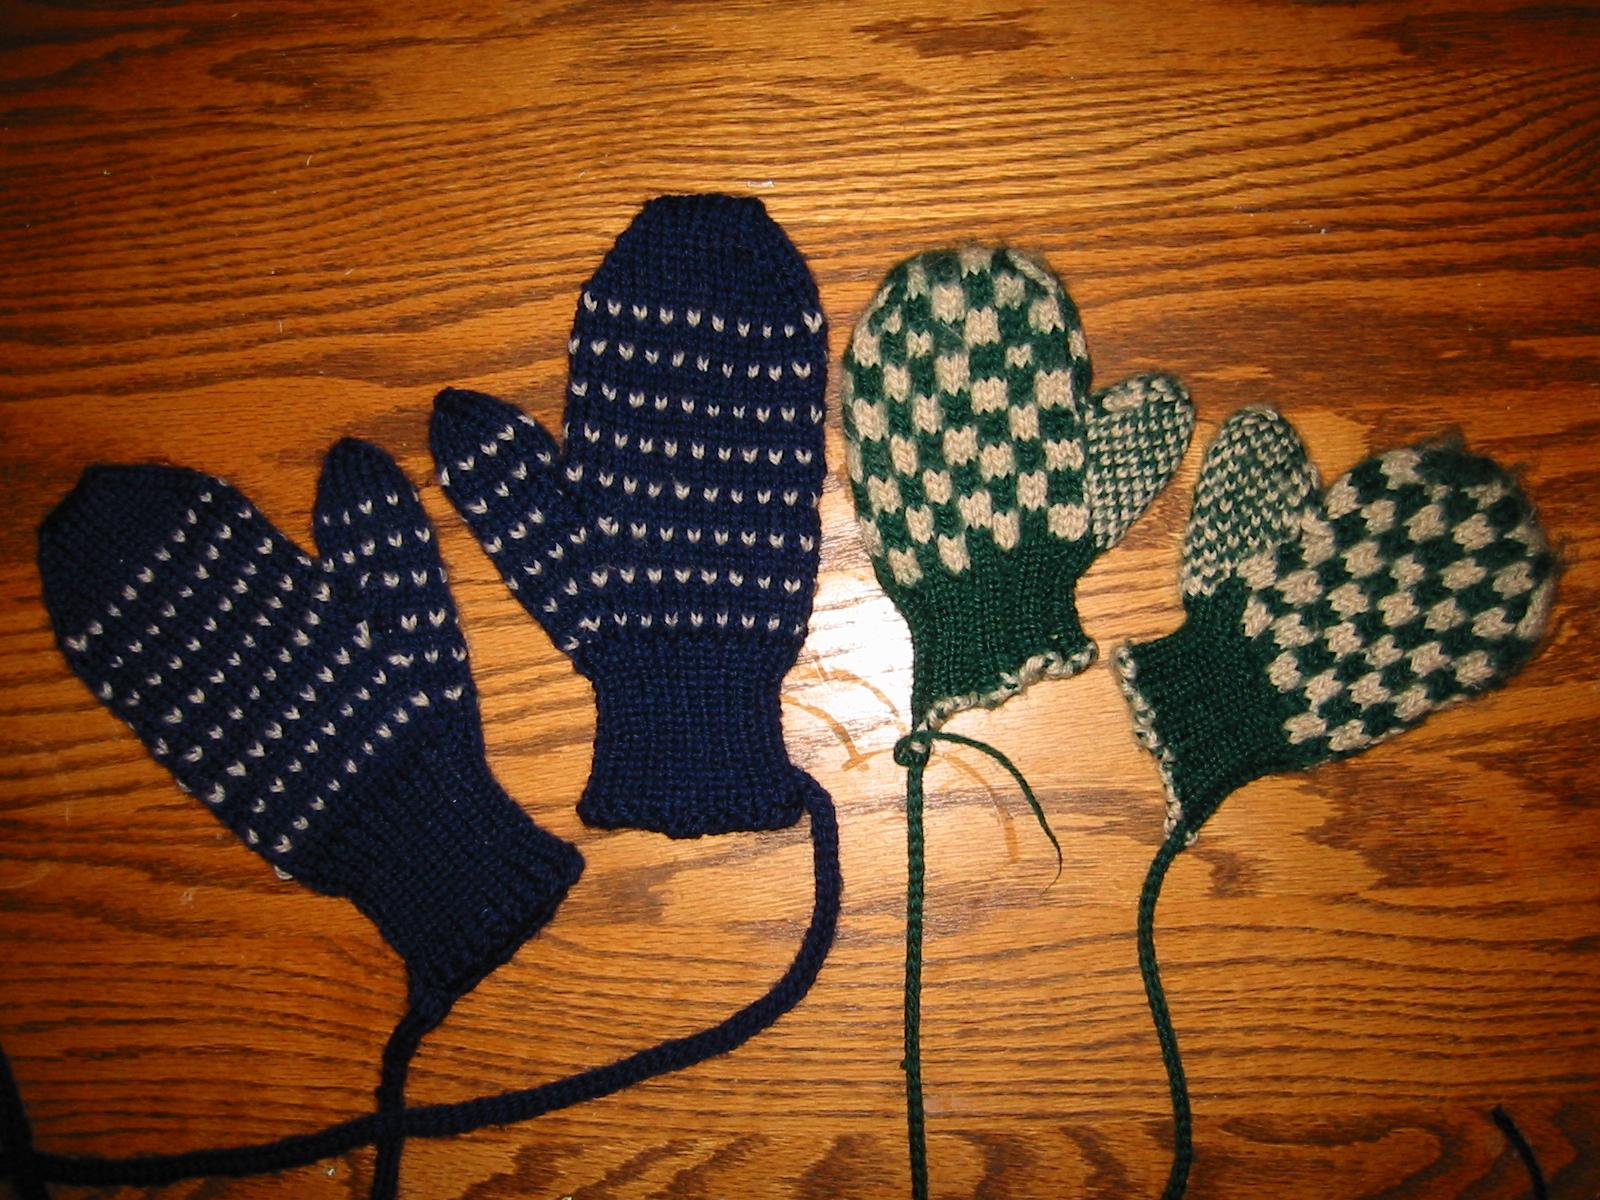
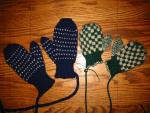 I just made the blue mittens for Henry -- he finally outgrew the green ones! He wore them for three years. :) Both
pairs are made of lovely Cleckheaton washable wool. The anti-loss strings are Elizabeth Zimmermann's
knitted I-cord (use double pointed needles,
cast on three, knit, slide stitches to other end of needle, pull yarn around back, knit again, repeat). I
invented the pattern as I went... but basically, knit a nice 1x1 ribbed cuff with needles a size or two smaller than
usual, switch to normal needles,
then divide the stitches so you have a few stitches on the 2nd needle for the thumb. I used 6 for the blue
mittens but I think it would have been better to start with 4 or even 2. Then increase one stitch on each side
of the thumb needle every other round until you have about enough. Put the thumb stitches on a string, and cast on across
the space as you knit around the hand so you have the same number of stitches you started with. Knit up and finish the
hand in your favorite sock-toe decrease. Put the thumb stitches on two needles and pick up those cast-on stitches with
a third. I pick up a couple extra and decrease them away on the next round. Knit up the thumb and finish off. Voila!
Email me if you need help :)
I just made the blue mittens for Henry -- he finally outgrew the green ones! He wore them for three years. :) Both
pairs are made of lovely Cleckheaton washable wool. The anti-loss strings are Elizabeth Zimmermann's
knitted I-cord (use double pointed needles,
cast on three, knit, slide stitches to other end of needle, pull yarn around back, knit again, repeat). I
invented the pattern as I went... but basically, knit a nice 1x1 ribbed cuff with needles a size or two smaller than
usual, switch to normal needles,
then divide the stitches so you have a few stitches on the 2nd needle for the thumb. I used 6 for the blue
mittens but I think it would have been better to start with 4 or even 2. Then increase one stitch on each side
of the thumb needle every other round until you have about enough. Put the thumb stitches on a string, and cast on across
the space as you knit around the hand so you have the same number of stitches you started with. Knit up and finish the
hand in your favorite sock-toe decrease. Put the thumb stitches on two needles and pick up those cast-on stitches with
a third. I pick up a couple extra and decrease them away on the next round. Knit up the thumb and finish off. Voila!
Email me if you need help :)
|
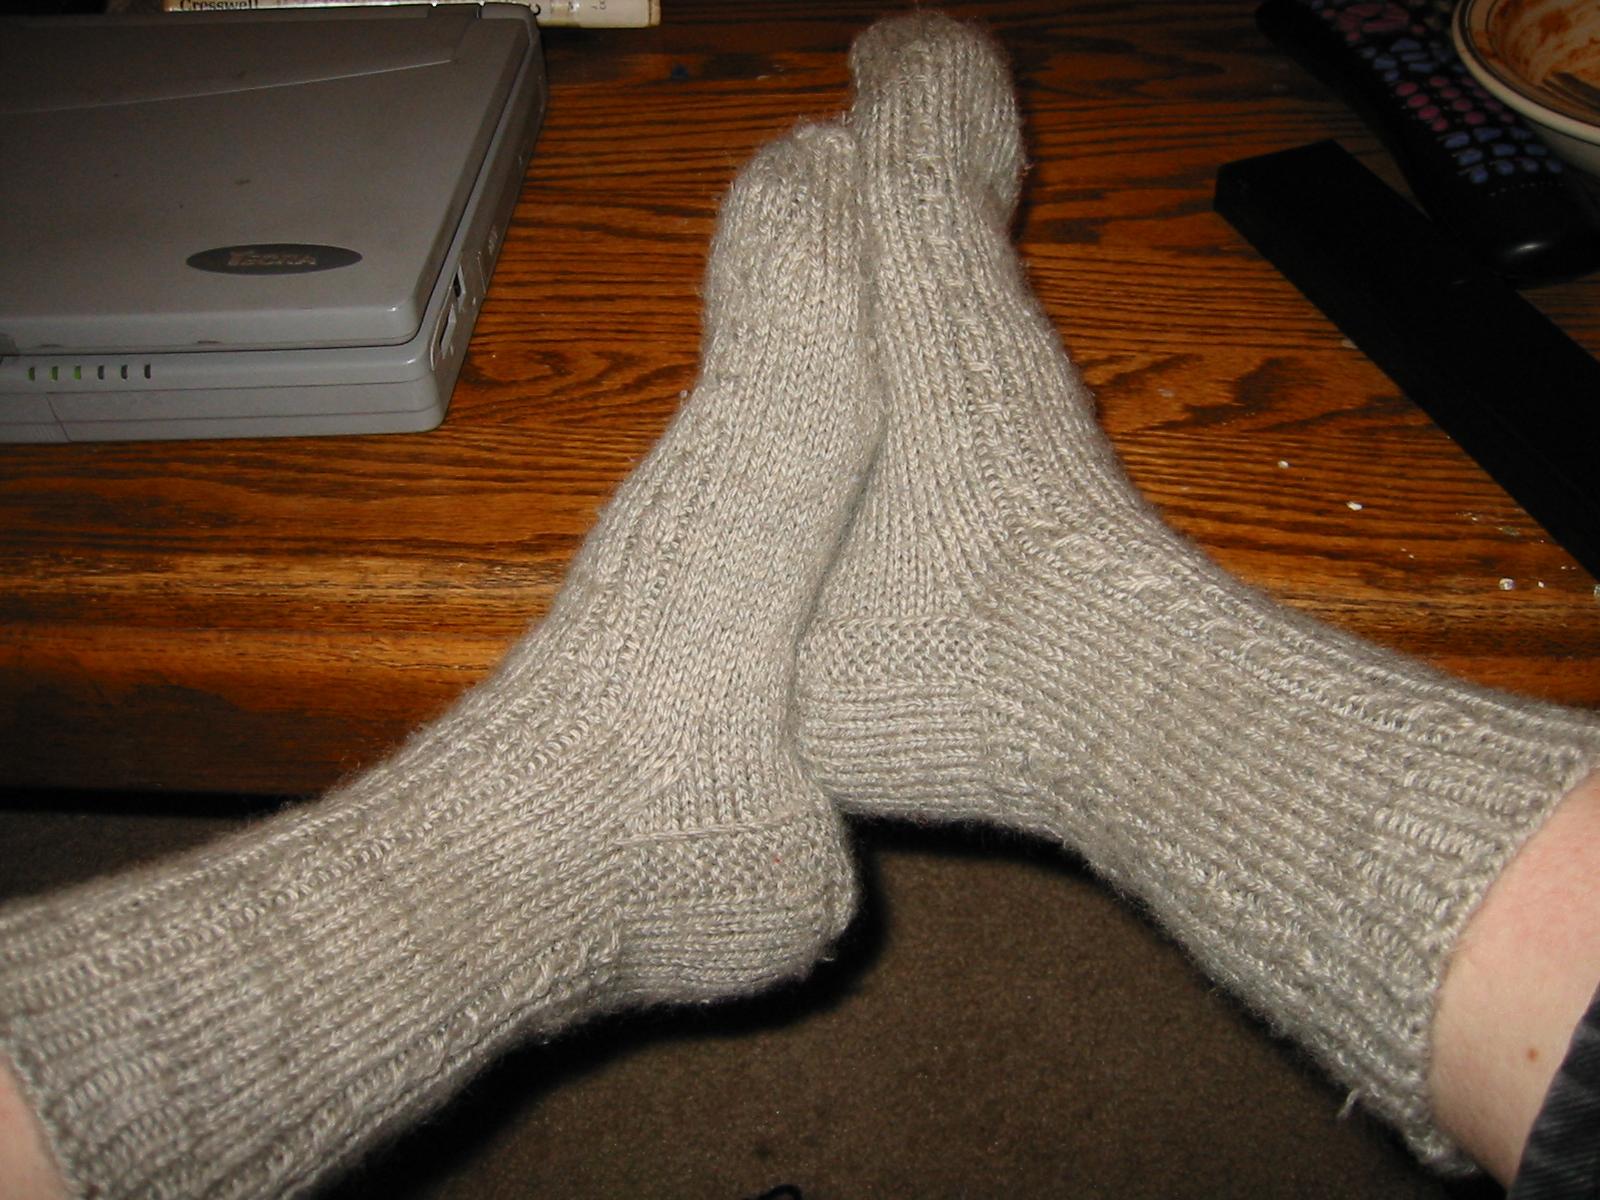
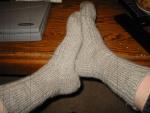 I got out my knitting bag, thinking I'd make a pair of socks, and found a pair that I had started a while ago and forgotten
about! There was a sock and a half done, so all I had to do was figure out how to finish the second sock to match the first one.
Not too tricky. As you can see, I made a little delicate cable pattern down the leg and foot.
These are made out of Cleckheaton wool, and are
so soft and warm!
I got out my knitting bag, thinking I'd make a pair of socks, and found a pair that I had started a while ago and forgotten
about! There was a sock and a half done, so all I had to do was figure out how to finish the second sock to match the first one.
Not too tricky. As you can see, I made a little delicate cable pattern down the leg and foot.
These are made out of Cleckheaton wool, and are
so soft and warm!
|
 Henry and I made these potholders with his little potholder loom and his new
wool loops! Aren't they pretty?
Very thick and soft, too.
Henry and I made these potholders with his little potholder loom and his new
wool loops! Aren't they pretty?
Very thick and soft, too.
|
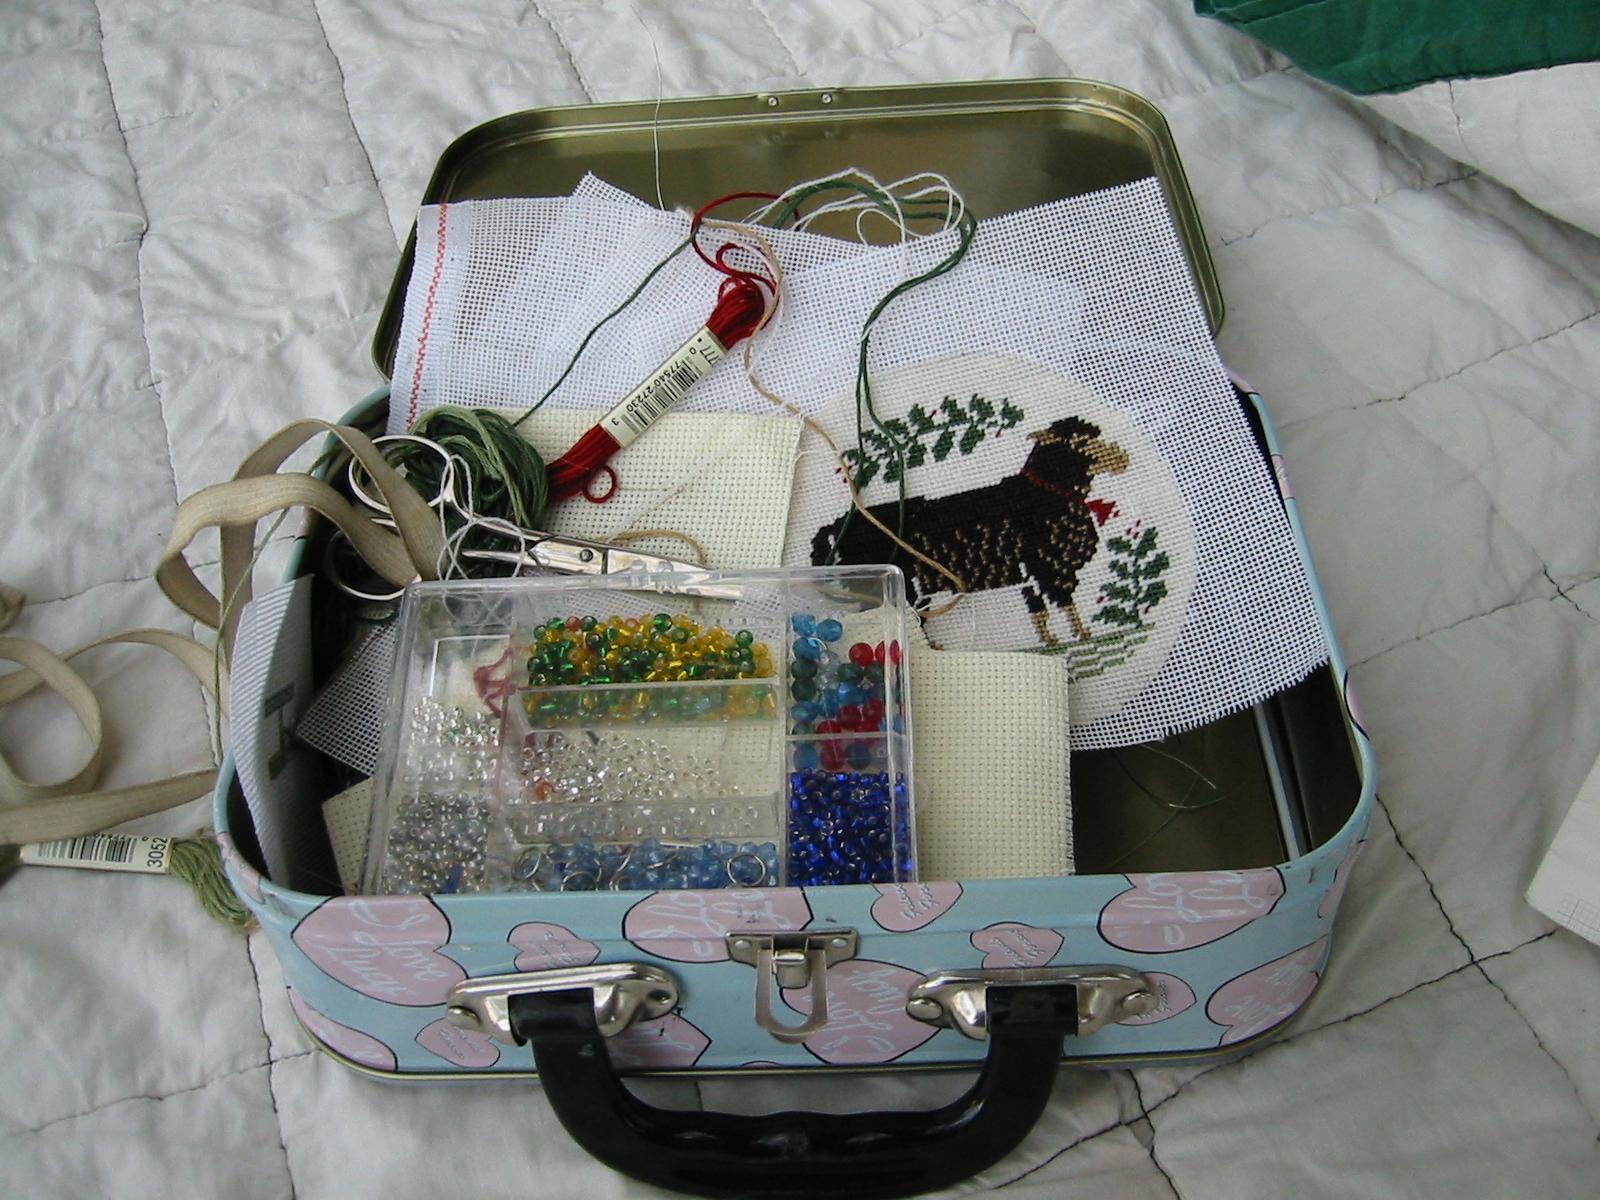
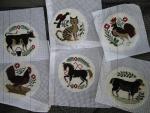 I've been working on these needlepointed ornaments since December last year (2001). The pattern
was meant to be cross-stitched, but since I decided to needlepoint them on a very fine canvas, they
take a LONG time to make because I have to fill in that white background. I carry them with me everywhere,
in my Lucy Lunchbox. The rooster's not done yet -- I ran out of brown embroidery floss.
I've been working on these needlepointed ornaments since December last year (2001). The pattern
was meant to be cross-stitched, but since I decided to needlepoint them on a very fine canvas, they
take a LONG time to make because I have to fill in that white background. I carry them with me everywhere,
in my Lucy Lunchbox. The rooster's not done yet -- I ran out of brown embroidery floss.
|
 I love knitting, and I especially love knitting socks. They don't take forever to make, I don't
need a pattern (Elizabeth Zimmerman taught me how to make socks in her wonderful book, "Knitting
Without Tears"), and they are useful -- even in Southern California (my feet are always cold in the
winter). I use wool (refuse to work with synthetics -- ugh). I prefer Cleckheaton yarn, when I can get
it. It's soft, non-itchy, and it won't shrink or felt when washed! The green pair I made for Dan,
and the blue pair was mine but, alas, all I had to work with for
that pair was a lower-quality wool which shrank drastically when the socks accidentally got into the
washing machine. So now the blue ones belong to Henry! :)
I love knitting, and I especially love knitting socks. They don't take forever to make, I don't
need a pattern (Elizabeth Zimmerman taught me how to make socks in her wonderful book, "Knitting
Without Tears"), and they are useful -- even in Southern California (my feet are always cold in the
winter). I use wool (refuse to work with synthetics -- ugh). I prefer Cleckheaton yarn, when I can get
it. It's soft, non-itchy, and it won't shrink or felt when washed! The green pair I made for Dan,
and the blue pair was mine but, alas, all I had to work with for
that pair was a lower-quality wool which shrank drastically when the socks accidentally got into the
washing machine. So now the blue ones belong to Henry! :)
|
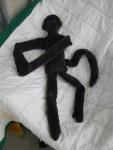 A while back, Henry decided he wanted a monkey toy, so I made a
simple pattern and we made a lovely gray monkey out of soft, stretchy cotton velour (from an old pair of
pants). He's got a bendable wire in his tail, and velcro on his paws so he can hug Henry :)
A while back, Henry decided he wanted a monkey toy, so I made a
simple pattern and we made a lovely gray monkey out of soft, stretchy cotton velour (from an old pair of
pants). He's got a bendable wire in his tail, and velcro on his paws so he can hug Henry :)
|
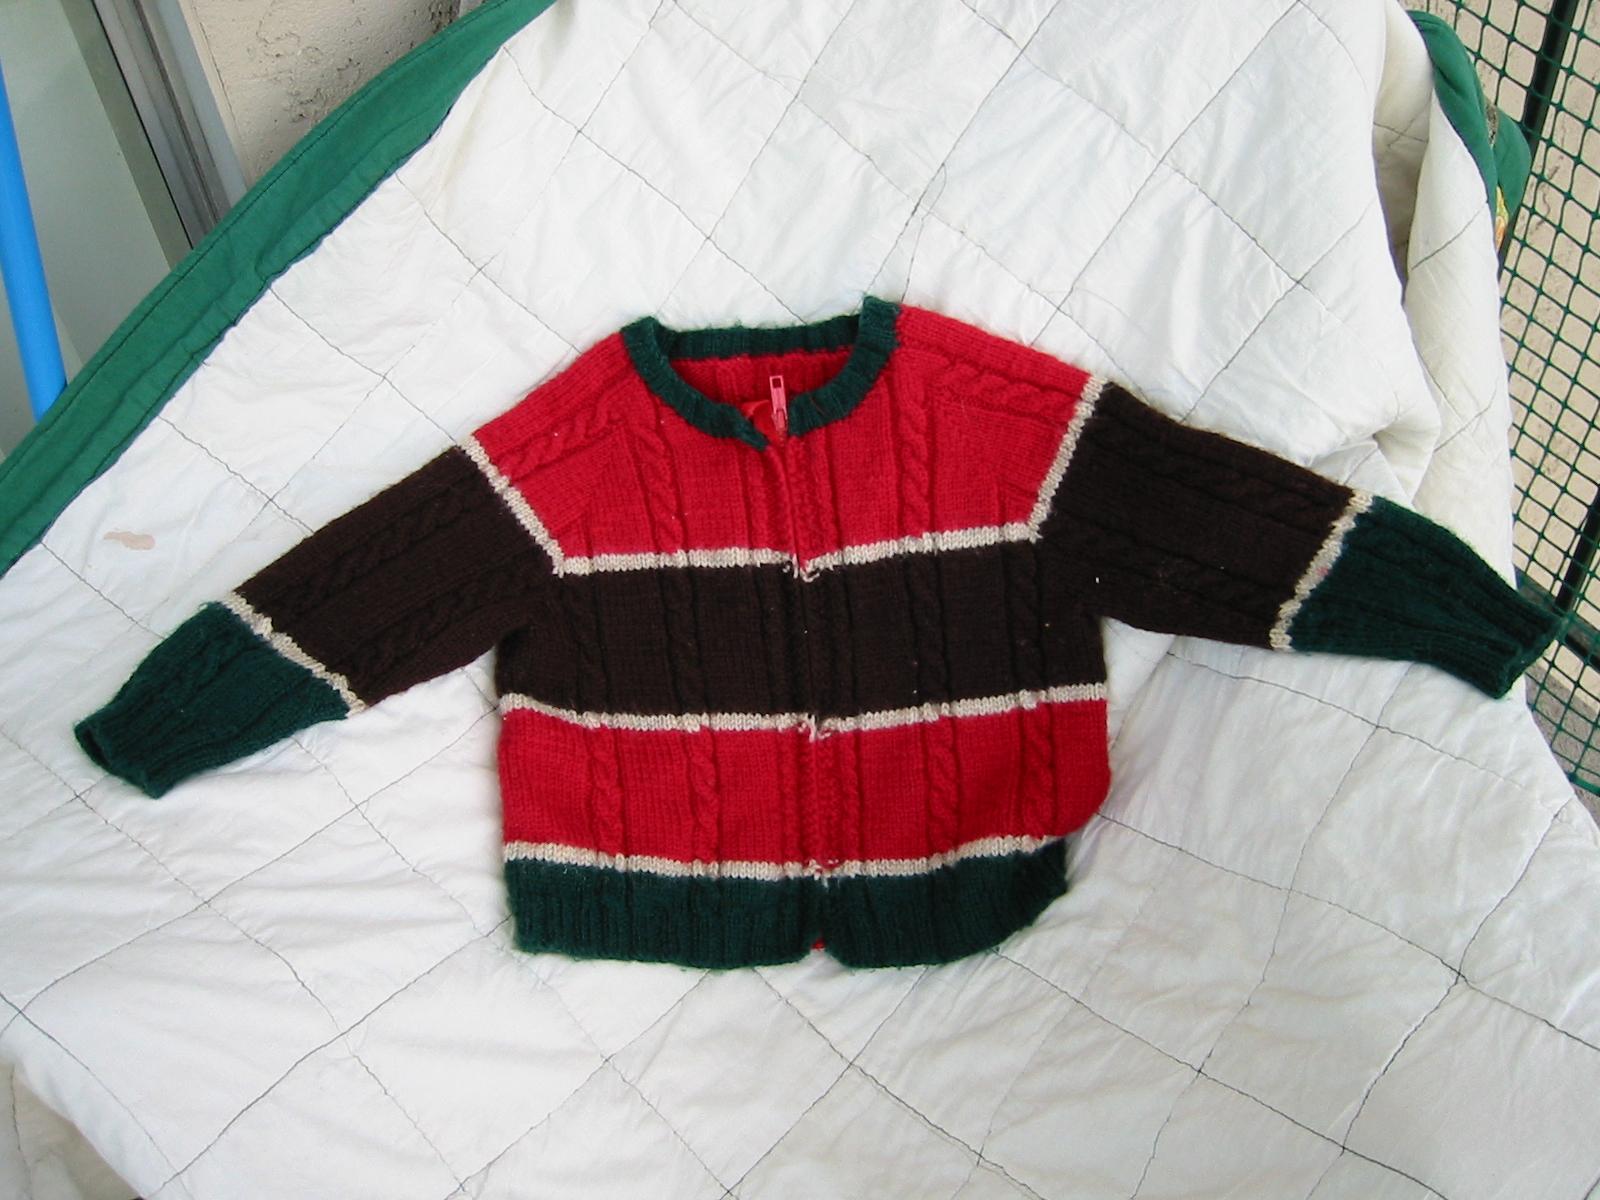
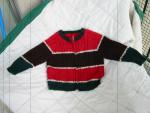 Here's Henry's sweater. I made it when he was about three, I guess, and he wore it for years (I
made the arms nice and long for growing room) It's all one piece (no sewing pieces together!),
knitted this one from the
top down, following Barbara Walker's instructions in her "Knitting from the Top". Excellent book!
This really shows how Cleckheaton yarn holds up to washing and wearing for years. Yep, it closes with
a zipper, Mister Rogers-style :)
Here's Henry's sweater. I made it when he was about three, I guess, and he wore it for years (I
made the arms nice and long for growing room) It's all one piece (no sewing pieces together!),
knitted this one from the
top down, following Barbara Walker's instructions in her "Knitting from the Top". Excellent book!
This really shows how Cleckheaton yarn holds up to washing and wearing for years. Yep, it closes with
a zipper, Mister Rogers-style :)
|
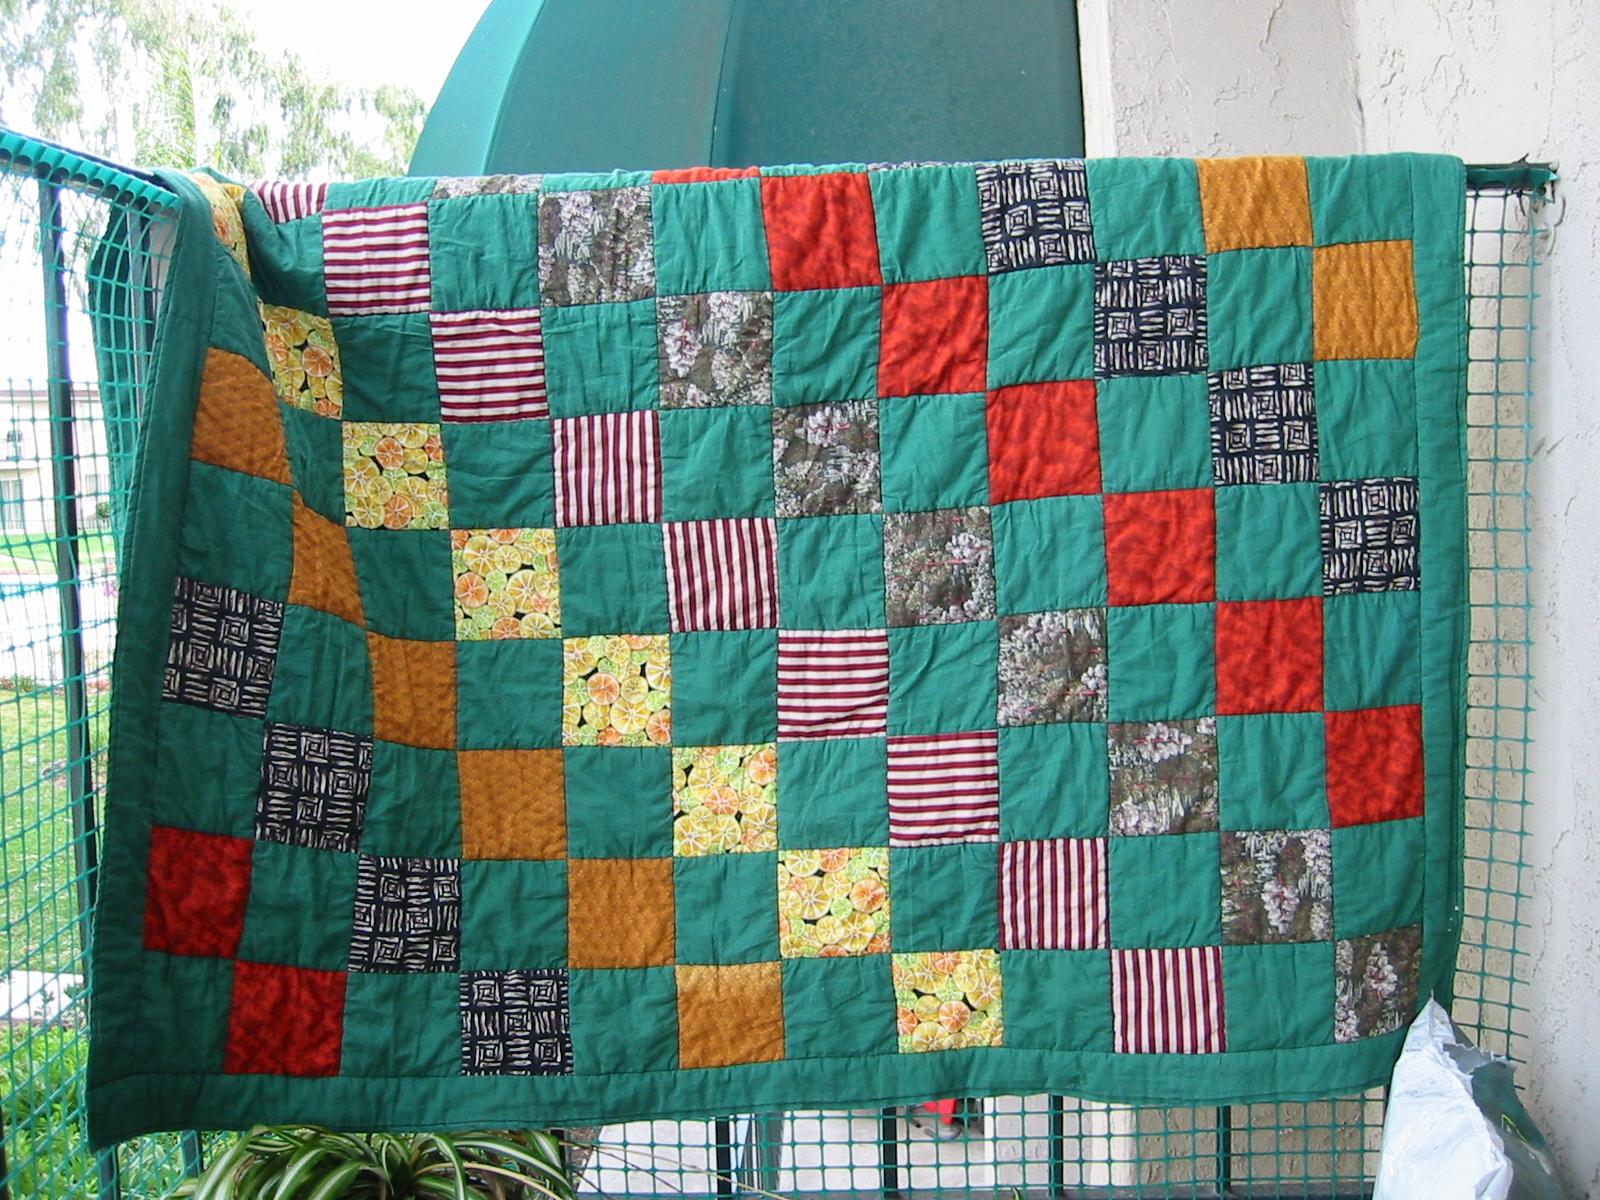
 Here's the quilt I made for Henry when he was born. The colors are a little darker and richer in real life.
He's 7 now, and I still spread this quilt over him every night, when I go in to check on him before I go to bed :)
Here's the quilt I made for Henry when he was born. The colors are a little darker and richer in real life.
He's 7 now, and I still spread this quilt over him every night, when I go in to check on him before I go to bed :)
|
|
|


