Mastodon Free Patterns — kayray.org

Category: Free Patterns


March 1, 2012

March 1st, 2012 — 10:23am

Happy March! Hope you had a good Leap Day yesterday, and that Leap Day William brought you lots of candy.

Last night I invented a handkerchief edging that I like a lot. Thought I’d write it up here so I can remember how to do it.

photo

Mark off a hemmed hankie in inches and imagine 1/2 and 1/4 inch marks too. Shells happen at every inch mark and at the corners, and all the scs are at 1/4-inch intervals between the shells.

Starting at an inch-mark: 6 dc, sc, ch1, sc, ch3 picot, ch1, sc. Then you’re ready to do another 6 dc at the next inch-mark.

At corners work 8 dc.

Easy! Pretty! Delicate!

Comment » | Free Patterns, Handmade

Mosaic Headband Pattern

June 14th, 2011 — 11:04am

I designed a sweet little headband using Barbara Walker’s “mosaic” technique, and I wrote up the pattern, made a PDF, and posted it to the Ravelry store. You can download the pattern PDF here: Mosaic Headband

The Ravelry pattern page is here:
http://www.ravelry.com/patterns/library/mosaic-headband (no login required)

And now, photos!

I made the first one with green and white Risata:
photo

After I posted it on Rav, I got a lot of compliments and even a few requests that I’d write up a pattern, so I did. And then I knit a blue and white one with Palette while following my own pattern so I could check for mistakes and confusion:

P6132616

P6132632

I’ve always been intimidated by mosaic knitting. The descriptions are always so wordy and I couldn’t quite believe that it would work. But when I decided to be brave and try it out on this little project, I discovered how fun and easy it is! To sum up: you follow a chart of dark and light squares. You knit across and back with only one color of yarn, then drop that color and knit back and forth with the other color. While knitting with color A, you slip any stitches which are color B on the chart. Both directions. That’s it, that’s all there is to it. Just try it!

2 comments » | Blog, Free Patterns, Handmade

Sweet Alyssum Socks

March 12th, 2009 — 11:30am

DSC05374

This eyelet pattern reminds me of the Sweet Alyssum flowers that grew in our yarn when I was a kid. If I remember correctly, there were white ones and purpleish ones, so if I make these socks again I’ll choose purple instead of orange.

I wrote up this pattern in a way that makes sense to me, but if you find it confusing please let me know and I’ll try to clarify :)

This sock fits my skinny size 7.5 foot with room to spare. The eyelet pattern and the Risata are both nice and stretchy.

One ball Knitpicks’ Risata in Clementine (use Fairy Tale or Marionberry for more botanically accurate socks)
One ball Knitpicks’ Risata in Buttermilk

Needles size 0 (I knit very loosely — you may need to use needles several sizes larger to get gauge)

Gauge in Stockinette: 6.5 st/inch

Eyelet chart:
20090312-p6htfu3damdw7ty7ciahxasibj

Cast on 48 stitches. I used both colors and this lovely, two-needle, stretchy cast on: http://www.youtube.com/watch?v=xXDMsy949yw. That’s my favorite cast-on for cuff-down socks and mitten cuffs.

Work 11 rounds k2 p1 ribbing in Buttermilk.

Switch to Clementine, and begin eyelet chart.

After 8 rounds of Clementine, switch back to Buttermilk and work next section of eyelet chart. Move round marker forward one stitch so that the eyelet pattern fits within the round. As you knit around, you may need to shift stitches from one needle to another to avoid having to work eyelet motifs between needles. Do whatever makes it easy. Buttermilk eyelet motifs will be centered between the Clementine ones. I carried the yarn loosely up the back of the sock between color rounds so I didn’t have a million ends to weave in.

Continue switching colors every 8 rounds and shifting round marker one stitch forward or back until you have four Clementine stripes.
Work heel flap in Clementine on 25 stitches. Be sure that your heel flap is centered relative to the lace pattern! I like a long heel flap so I worked 30 rows, I think. I used the basic Heel Stitch. Turn the heel according to your favorite method. I prefer a German heel.

Switch to Buttermilk and pick up gusset stitches. Here’s a good way to avoid holes at the corners of your gusset: http://www.youtube.com/watch?v=EOI_oXPm1iA.

Arrange stitches so you have your 24 instep stitches on one needle, and continue eyelet pattern across that needle as established. Keep the sole of the foot and gussets in stockinette and decrease away your gusset stitches every other round, with k2tog just before you knit the instep stitches and ssk right after, until you are back at 48 stitches.

Knit in pattern until you have 5 Buttermilk stripes on foot. Switch to Clementine for toe. (If you have a shorter foot, knit until you have 4 Clementine stripes on foot and make toe with Buttermilk)

Pretty Little Toe (my hybrid of Round Toe and Flat Toe):
k 1 round Clementine
Decrease round: k6, k2tog around (42 st)
k 5 rounds plain
Dec round: k5, k2tog around (36 st)
k 4 rounds plain
Dec round: k4, k2 tog around (30 st)
k 3 rounds plain
Dec round: k3, k2tog around (24 st)
k 2 rounds plain
Dec round: k2, k2tog around (18 st)
k 1 round plain

Arrange stitches on two needles so you have 9 instep stitches on top needle and 9 sole stitches on bottom needle. KNit a few stitches as necessary to get yarn to side of toe. Graft stitches together (tutorial here).

Block to open up eyelets, and wear!

****************

Detail of the Pretty Little Toe:
DSC05376

DSC05375

DSC05372

Genuine Sweet Alyssum flowers. Look, each tiny flower really does have four petals!

alyssumnew.jpg

6 comments » | Blog, Free Patterns, Handmade

edging chart

March 2nd, 2009 — 12:51pm

By popular demand, here’s a chart for the edging I used on Kathy’s Stole. It’s a heavily modified version of an antique edging I found online somewhere. The original was twice as wide and didn’t use nicely balanced decreases. Enjoy!

20090302-ewc9876aa8eqg2cpk25hsisfsu

1 comment » | Blog, Free Patterns, Handmade

Leftover Laceweight Fern Lace Scarf

May 26th, 2008 — 3:21pm

Updated October 17 2008 with better edging instructions!
DSC04492

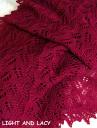
I had about 38 grams of a 50-gram skein of Knitpicks’ Shadow merino laceweight leftover from my sister’s Print o’ the Wave stole, and I wanted to whip up a bit of lace to enter in our fair this summer. So I planned out an easy little lace scarf. I knit the edging on the long sides as I went along, so I was able to use up almost all the yarn and then just save a little for the edging on the two short sides.

DSC04493

Yarn: any leftover laceweight, 30 grams or more (less is fine but will make a rather short scarf)
Needles: your favorite lace needles. I used Knitpicks Harmony circs size 2, but I am a notoriously loose knitter, and I think it would have looked better if I’d used bigger needles anyway. You’ll probably want size 3 to 5, or even larger if you knit very tightly. Larger needles = longer/wider scarf.
Finished Dimensions: Mine turned out to be about 9 1/2″ x 52″ after blocking. Yours will surely vary somewhat!

Ok, think of this scarf as being made of several columns. The right-side edging is the first column, then a 2-stitch always-purl garter column, then a fern-lace column worked over 16 stitches, then another 2-stitch column of garter, then another fern-lace column, then another garter column, then the left edging. If you want a wider scarf or a stole and you have plenty of yarn, you can work more fern lace columns separated by garter columns. If you want skinny, just work one repeat of the fern lace (just like the chart).

Wrong sides: always knit the wrong side of the edging, always purl the wrong side of the fern lace and garter columns. I’ll say this again later on so you don’t forget.

Start by casting on using your favorite provisional cast-on. I prefer this one.

You’ll need 4 st for the right edging, 2 for the first garter column, 16 for one fern repeat, 2 for the garter column between fern repeats, another 16 for the second fern repeat, 2 more for the last garter column, and then 4 for the left edging. Which makes, um, 46. Yes, cast on 46! Place ring markers between every column so there’s never any doubt what’s what and where you are. Seriously. I don’t usually have to do that, but I messed up a lot until I gave in and placed markers.

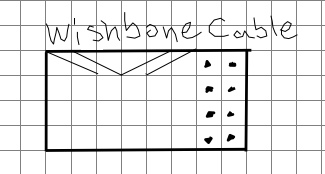
Now begin following the chart. Chart shows only odd-numbered right side rows (if I’d remembered to write the numbers in they’d be 1, 3, 5, 7, etc.) Go ahead and write them in :) For even-numbered, wrong-side rows, KNIT the edging stitches and PURL all the other stitches.

DSC04503
(D’OH. I forgot a symbol key. Circle = YO. Dot = purl. Right edging dec: ssk. Left edging dec: k2tog. Right side of fern lace dec: k3tog. Left side of fern lace dec: sl1, k2tog, psso) (Another note: the edging is an 8-row repeat. The fern lace is a 12-row repeat. The chart shows 24 rows so the two patterns work out even.)(Chart shows only odd-numbered, right-side rows)

Casting off for pointy edging:
When you complete the 7th row, you’ll have 8 edging stitches on each side. On the 8th (wrong-side) row, cast off the first 4 stitches so you only have 4 stitches remaining before the first marker. Work across. When you turn to begin the 9th row, immediately cast off 4 stitches (4 stitches remain before first marker) — then follow chart for row 9 (k1, yo, ssk, yo, k1).

Ok, so keep working until you’re nearly out of yarn. End after having cast off the edge stitches so there are 4 stitches remaining on each side next to the purl columns (you might have to fudge this a bit). I put my working stitches on a string after a while and worked the edging across the cast-on stitches using the other end of the yarn, and then I knew I really only needed a little bit left for the last short edging.

To work the short-end edgings:

If you’ve ever knit an edging onto a piece of lace, you know what to do. If you haven’t, well, I’ll do my best to explain :)

Hold the scarf right-side facing you, and cast-on edge up. Slide a needle through 6 cast-on loops from left to right – 4 loops for the edging and 2 loops for the garter column. The tip of the needle will be pointing toward the rest of the cast-on loops. Ok. Now, slide the other end of your circular needle through the rest of the loops from right to left.

edging02

Start working from the point between the needles, toward the left . You’ll be working the garter column and edging according to the left side of the chart. Always SLIP the first stitch of EVERY RIGHT SIDE row. So, for the first row: sl1, p1(place marker here to divide edging from garter column), k1, yo, k2tog, yo, k1. Turn, work wrong-side row: K5, slip marker, p1 — NOW ssk the last st together with the first stitch from the other needle. Drop the right-most loop of the ssk’d stitch but leave the left-most loop on the needle, and use it next time to help the corner lie flat.

edging03

Turn, work next RS row from chart: sl1, p1, slip marker, k2, yo, k2tog, yo, k1.
Turn, work next WS row: k6, slip marker, p1, ssk with the stitch you didn’t drop last time to help the corner lie flat. Drop the whole ssk’d stitch this time.

Next RS row: sl1, p1, slip marker, k3, yo, k2tog, yo, k1. Turn. WS row: k7, slip marker, p1, ssk (drop only right loop of ssk’d stitch again, and save left loop for the next ssk)
RS row: sl1, p1, slip marker, k4, yo, k2tog, yo, k1, turn.
WS row: this is the 8th row, the one where you cast off four stitches to create a point. CO 4, k4 (make sure you have only 4 loops left before marker), slip marker, p1, ssk with leftover loop of last ssk.

edging04

edging05

Keep working edging and purl column, decreasing away stitches from the original cast-on stitches on every wrong side row (don’t double up ssks anymore) until there are only 8 cast-on stitches left. (Better put a marker 8 stitches in from the other side so you remember that that’s the time to double up your ssks again (ask me how I know that you’ll forget otherwise… )

For the last repeat, double up the decreases again so the corner lies flat. That will eat up two of the last 8 stitches.

Then when you’re all done, weave the 6 remaining cast-on stitches together with the 6 working stitches. Voila!

edging06

edging07

Do the same thing with the live stitches at the other end of the scarf.

Gently wash and block your scarf. Enjoy!

DSC04501

UPDATE (July 8 2008): At our County Fair this year, my scarf won first prize and a special donated award — a $50 gift certificate to a local yarn store, Common Threads, in Encinitas.

DSC04745

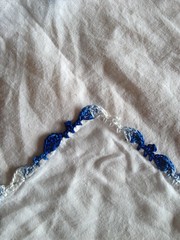
Here’s Marlene‘s scarf:

marlene’s scarf

54 comments » | Blog, Free Patterns, Handmade

Happy Striped Socks, finished

March 26th, 2008 — 6:51pm

Henry’s Happy Striped Socks are done!

DSC04275

Yarn: Knitpicks’ Risata — one entire skein of blue, with only a couple yards left over, and less than half of a skein of buttermilk.

Needles: Knitpicks’ Harmony 32″ wooden circs, size 0

Vague Details:

CO 16 st using Judy’s Magic Cast-on. Make toe till you have 52 st total. Move one st from sole to top (25/27). Top is k3,p1. (End k3) Work two rounds white, 5 rounds blue till you have 9 white stripes. Make ordinary Dutch heel on 25 st (heel flap will be under the heel) for 14 ridges. Turn heel on 8+9+8. Pick up all those side stitches. Decrease away gusset stitches every third round. Continue ribbing pattern for 5 more white stripes. Switch to k1p1 ribbing in blue for 12 rounds, then 4 rounds double knitting to prep for grafting (14 rounds total), then graft. Done!

Kung Fu Socks!

DSC04277

In progress:

DSC04271

I love the Magic Loop method! I’d never knit socks that way before. It made them go really fast, because you only have to fiddle with your needles twice every round, instead of four times! Also it made them way more portable, and easier to try on at any time. I’ve started another pair just like these but in green and brown — Henry’s choice. I also discovered that i don’t hate toe-up socks if I don’t try to make a fancy backwards heel. A regular old Dutch heel is just fine.

1 comment » | Blog, Free Patterns, Handmade

Knitted Chainmail Hauberk for a Young Knight

October 16th, 2007 — 2:04pm

hauberk thumbnail

Materials:

About 200 grams worsted weight wool or wool blend — this will be plenty even if your Knight is bigger than mine and you want short sleeves. I suggest Knitpicks’ Wool of the Andes. At $2/ball for real wool you just can’t find a better deal!

Size 15 circular needles (Or bigger. Or smaller. Add or subtract a few stitches from the body if you use different size needles, or your knight is more round or much smaller than mine. Garter stitch is VERY stretchy, so don’t sweat it too much.)
Yarn needle
Scrap yarn for cast on and stitch holders

The Chainmail Hauberk:

Using scrap yarn and a provisional cast on, cast on 30 st for top of shoulders.

Back: Work back and forth in garter stitch to underarm (8 ridges or so for a sleeveless hauberk, maybe 9 or 10 if you want sleeves. Use your own judgement.) Put these 30 stitches on a string, and pick up 30 from the cast on edge.

Front/neck: Work 10 stitches (right front). Cast off the next ten. Work the next ten (left front). Turn. Work ten, drop yarn, skip the ten cast off stitches, use the other end of the yarn (or the other ball) to work the next ten. Turn.

Neck increase row: work to last stitch of right front, make one, knit last stitch. Now the right front has 11 stitches. For the left front, knit one stitch, make one, knit to end. Now the left front has 11 stitches too.

Knit back across for the wrong side, using both balls of yarn to keep fronts separate.

Repeat the right-side neck increase row and the wrong-side plain row until you have a total of 30 stitches again: 15 for the right front and 15 for the left front. On the next right-side row, knit all the way across with the first ball of yarn so the two sides are joined.

Continue working back and forth to underarm (count ridges and make the front match the back), then join with back section and begin to work in the round. Place a marker at the join. Now that you’re knitting in the round, you’ll need to purl every other round to stay in garter stitch. Invite your Knight to help!

(If you don’t want to purl, leave the front and back separate and sew up the side seams when you’re done.)

Here is how it looks after having used up my first ball of yarn:

chainmail

When the body is long enough (to lower hip), work a split in front and back to allow easy horseback riding:

Put all 60 stitches on a string. Starting at center front (count 15 over from the side marker), pick up 30 stitches (to center back). Work these 30 stitches back and forth until the flap is long enough (8-10 ridges). Cast off.

Pick up the remaining 30 side stitches and work flap to match the other one. Cast off. Weave in ends.

If you want sleeves, pick up stitches around the arm holes. I’d work flat and weave the underarm seam so you don’t have to do any purling :)

And now, photos of the finished armor!

knitted chainmail

knitted chainmail

knitted chainmail

knitted chainmail

knitted chainmail

(Thanks for letting me take pictures even though you still don’t feel well, Henry :)

(When Ravelry goes live, you can visit this project there: Chainmail Hauberk for a Young Knight)

51 comments » | Blog, Free Patterns, Handmade

Three-color mitts!

September 18th, 2007 — 1:45pm

I’ve finished Henry’s mitts!

three-color mitts

I used Knit Picks palette yarn in black, green, and blue. This yarn is an absolute dream for colorwork, and it blocked just beautifully. I was inspired by Eunny Jang’s lovely Endpaper Mitts. I used her thumb shaping and the purled seam stitch at each side, which makes a nice distraction to the eye at the point where the pattern jogs.

Here’s a quick outline of my pattern:

With blue, CO 48 (use a nice stretchy cast-on). Work 2×2 ribbing on size 0 needles for 30 rounds. K one round in blue, adding a p at each side for seam stitches (50 st).

Switch to size 2 needles.

The colorwork is just 2 blue, 2 black around twice, then 2 black, 2 green around twice, keeping purled seam stitch in black, but you also have to add a stitch in pattern on either side of ONE seam stitch every three rounds for the thumb gusset. (If you want a chart, leave a comment and I’ll write one up.)

When you’ve got 12 total extra stitches for the thumb, put those 12 plus the seam st on a length of yarn and CO one p st in black across the gap, and work for four more stripes. K one round blue, then work 5 rounds k1p1 ribbing, then work k1, sl1wyif around, then sl1wyib, p1 around, then work a kitchener bind-off.

Put the 13 thumb st on two needles and pick up 5 more across the gap, then work ribbing same as for hand.

Henry loves them and wore them all day today :)

three-color mitts

They fit me as well as they fit Henry:
three-color mitts

three-color mitts

4 comments » | Blog, Free Patterns, Handmade

Wishbone Socks

May 19th, 2007 — 10:05pm

wishbone socks

Wishbone Socks, by Kara
Yarn: Regia Cotton (wool/cotton/nylon) (Two balls)
Needles: Brittany Birch 2.0mm

Gauge: 8st/inch in stockinette

To fit a very slender foot and leg. (If you need to make them bigger, buy another ball of yarn. For an extra inch of width, increase toe to 64 stitches, then remember that you’ve got 4 extra stitches on bottom of foot; the other 4 on the top of foot, one in each purl column, so purl columns are 4, 3, 3, 4. You might also want to inc 8 stitches at calf instead of 4. Distribute stitches logically.)

Cast on 16 st. using Judy’s Magic Cast-on. (8 st. on each needle)

Make a toe.

(if you need more specific instructions:
Divide evenly onto four needles.
Needle 1: k1, m1, k to end of needle.
Needle 2: k to last st, m1, k1.
Needle 3: k1, m1, k to end.
Needle 4: k to last st, m1, k1.)

Continue increasing every round until you have 32 stitches, then alternate plain rounds and inc. rounds until you have 56 st.

Rounds begin at needle 1 (side leg).

Needles 1 & 2 (28 st. total): p1, work 3 reps Wishbone Cable, p3
Needles 3 & 4 (28 st. total): k across.

wishbone cable
(Blodges represent purl sts, blank squares are knit. Cable crossing occurs on row four — diagram should make it obvious what to do)

18 reps of cable pattern, then make short-row heel. For the first sock, I used the short-row heel from Summer 2007 Interweave Knits, but I’m not very happy with it. I think the No-Holes one might be better: No-Holes Short Row Heels

When you’re working in the round again, add a single rep of the cable pattern on the back of the leg.
So 56 st. total on four needles:
Front of leg: Needles 1 & 2: p1, 3 reps cable pattern, p3 (divide somewhere convenient)(28st)
Back of leg: Needles 3 & 4: k9, cable pattern, p2, k9 (divide somewhere convenient)(28st)

Work 9 reps of cable pattern.

******
Calf increase:

M1 on either side of both 9-st columns of stockinette as follows: When you reach the first 9-st column of stockinette, k1, m1, k7, m1, k1. Repeat when you reach the second 9-stitch column of stockinette. (4 new st – 60st total)
******

Work 9 more reps of cable pattern, then work 18 rounds k1p1 ribbing and finish off with a stretchy cast-off. I used a grafted cast-off.

wishbone socks beginning

wishbone socks

wishbone socks

wishbone socks

10 comments » | Blog, Free Patterns, Handmade

Back to top